SpringBoot + Spring Security 学习笔记(三)实现图片验证码认证

整体实现逻辑

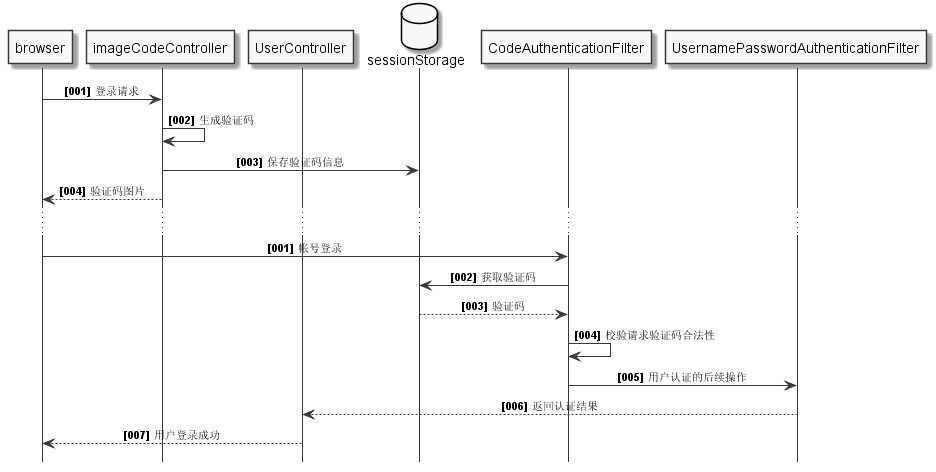
  1. 前端在登录页面时,自动从后台获取最新的验证码图片

  2. 服务器接收获取生成验证码请求,生成验证码和对应的图片,图片响应回前端,验证码保存一份到服务器的 session 中

  3. 前端用户登录时携带当前验证码

  4. 服务器校验验证码是否合法(验证码存在并未过期),继续后续的用户名和密码校验逻辑

通过一个时序图来表述如下图,图中细化了一下各个控制器和过滤器之间的功能职责,还不是很正规,只为了更好表达上述的流程描述,所以读者们将就一下:

时序图 plantUML 代码

plantUML 的使用教程请移步至之前发布过的文章:PlantUML 语法之时序图

1
2
3
4
5
6
7
8
9
10
11
12
13
14
15
16
17
18
19
20
21
22
23
24
25
26
27
28
29
30
31
32
33
@startuml
hide footbox
skinparam sequenceMessageAlign center
skinparam sequenceArrowFontSize 11
skinparam noteFontSize 11
skinparam monochrome true
skinparam lifelinestrategy solid

autonumber "<b>[000]"
participant browser as ui
participant imageCodeController as ic
participant UserController as uc
database sessionStorage as session
participant CodeAuthenticationFilter as cf
participant "UsernamePasswordAuthenticationFilter" as uf

ui -> ic: 登录请求
ic -> ic: 生成验证码
ic -> session: 保存验证码信息
ic --> ui: 验证码图片

...

autonumber "<b>[000]"
ui -> cf: 帐号登录
cf -> session: 获取验证码
session --> cf: 验证码
cf -> cf: 校验请求验证码合法性
cf -> uf: 用户认证的后续操作

uf --> uc: 返回认证结果
uc --> ui: 用户登录成功
@enduml

将上述的逻辑进行任务拆分:随机验证码和图片生成,生成验证码请求Controller,session存储器就临时使用spring-social-web包中的SessionStrategy来存储,验证码过滤器,配置过滤器到spring scuerity

过滤器中的用户密码验证过滤器之前。

前端控制器+生成验证码

服务器 session 容器

采用小步快走的开发模式,前端控制器和生成验证码的代码都写在一起,后期再进行代码重构, 这里主要引用了spring-social-web依赖:

1
2
3
4
5
<dependency>
<groupId>org.springframework.social</groupId>
<artifactId>spring-social-web</artifactId>
<version>1.1.4.RELEASE</version>
</dependency>

这个包里面有个很小巧的session管理工具:SessionStrategy

考虑到这个 session 在验证码过滤器中还得使用,所以自定义了一个配置,直接注入到了spring中:

1
2
3
4
5
6
7
8
9
10
11
12
13
14
import org.springframework.context.annotation.Bean;
import org.springframework.context.annotation.Configuration;
import org.springframework.social.connect.web.HttpSessionSessionStrategy;
import org.springframework.social.connect.web.SessionStrategy;

@Configuration
public class AppConfig {

@Bean("sessionStrategy")
public SessionStrategy registBean() {
SessionStrategy sessionStrategy = new HttpSessionSessionStrategy();
return sessionStrategy;
}
}

这样,在 Controller 层直接通过@Autowired引用即可。

图片验证码容器

图片验证码对象需要至少三个属性:图片,验证码,过期时间。

后期可能还有其他的验证形式,但是其中公共的部分:验证码和过期时间是可以抽象出来,这里为了演示不做重构。

1
2
3
4
5
6
7
8
9
10
11
12
13
14
15
16
17
18
19
20
21
22
23
24
import java.awt.image.BufferedImage;
import java.time.LocalDateTime;

import lombok.AllArgsConstructor;
import lombok.Data;

@Data
@AllArgsConstructor
public class ImageCode {

private BufferedImage image;
private String code;
private LocalDateTime expireTime;

public ImageCode(BufferedImage image, String code, int expireIn) {
this.code = code;
this.image = image;
this.expireTime = LocalDateTime.now().plusSeconds(expireIn);
}

public boolean isExpried() {
return LocalDateTime.now().isAfter(getExpireTime());
}
}

公共常量

在图片生成代码中,图片的尺寸,验证码的随机随机数长度和过期时间,都设计在了静态常量类中,当然也可以做成配置文件。验证码的 session 的唯一标识也做成了公共的,以便在验证码过滤器中进行校验时使用:

1
2
3
4
5
6
7
8
9
10
11
12
13
14
15
public class MyConstants {
public static final String SESSION_KEY = "SESSION_KEY_IMAGE_CODE";

// 图片宽度
public static final int WIDTH = 90;

// 图片高度
public static final int HEIGHT = 20;

// 验证码的位数
public static final int RANDOM_SIZE = 4;

// 验证码过期秒数
public static final int EXPIRE_SECOND = 30;
}

生成验证码请求Controller源码:

1
2
3
4
5
6
7
8
9
10
11
12
13
14
15
16
17
18
19
20
21
22
23
24
25
26
27
28
29
30
31
32
33
34
35
36
37
38
39
40
41
42
43
44
45
46
47
48
49
50
51
52
53
54
55
56
57
58
59
60
61
62
63
64
65
66
67
68
69
70
71
72
73
74
75
76
77
78
79
80
81
82
83
84
85
86
87
88
89
90
91
92
93
94
95
96
97
98
99
import static org.woodwhale.king.commons.MyConstants.EXPIRE_SECOND;
import static org.woodwhale.king.commons.MyConstants.HEIGHT;
import static org.woodwhale.king.commons.MyConstants.RANDOM_SIZE;
import static org.woodwhale.king.commons.MyConstants.SESSION_KEY;
import static org.woodwhale.king.commons.MyConstants.WIDTH;

import java.awt.Color;
import java.awt.Font;
import java.awt.Graphics;
import java.awt.image.BufferedImage;
import java.io.IOException;
import java.util.Random;

import javax.imageio.ImageIO;
import javax.servlet.http.HttpServletRequest;
import javax.servlet.http.HttpServletResponse;

import org.springframework.beans.factory.annotation.Autowired;
import org.springframework.social.connect.web.SessionStrategy;
import org.springframework.web.bind.ServletRequestUtils;
import org.springframework.web.bind.annotation.GetMapping;
import org.springframework.web.bind.annotation.RestController;
import org.springframework.web.context.request.ServletWebRequest;
import org.woodwhale.king.model.ImageCode;

@RestController
public class ValidateCodeController {

@Autowired
private SessionStrategy sessionStrategy;

@GetMapping("/code/image")
public void createCode(HttpServletRequest request, HttpServletResponse response) throws IOException {
ImageCode imageCode = generate(new ServletWebRequest(request));
sessionStrategy.setAttribute(new ServletWebRequest(request), SESSION_KEY, imageCode);
ImageIO.write(imageCode.getImage(), "JPEG", response.getOutputStream());
}

/**
* 生成图形验证码
* @param request
* @return
*/
private ImageCode generate(ServletWebRequest request) {
int width = ServletRequestUtils.getIntParameter(request.getRequest(), "width", WIDTH);
int height = ServletRequestUtils.getIntParameter(request.getRequest(), "height", HEIGHT);
BufferedImage image = new BufferedImage(width, height, BufferedImage.TYPE_INT_RGB);

Graphics g = image.getGraphics();

Random random = new Random();

g.setColor(getRandColor(200, 250));
g.fillRect(0, 0, width, height);
g.setFont(new Font("Times New Roman", Font.ITALIC, 20));
g.setColor(getRandColor(160, 200));
for (int i = 0; i < 155; i++) {
int x = random.nextInt(width);
int y = random.nextInt(height);
int xl = random.nextInt(12);
int yl = random.nextInt(12);
g.drawLine(x, y, x + xl, y + yl);
}

String sRand = "";
int length = ServletRequestUtils.getIntParameter(request.getRequest(), "length", RANDOM_SIZE);
for (int i = 0; i < length; i++) {
String rand = String.valueOf(random.nextInt(10));
sRand += rand;
g.setColor(new Color(20 + random.nextInt(110), 20 + random.nextInt(110), 20 + random.nextInt(110)));
g.drawString(rand, 13 * i + 6, 16);
}

g.dispose();

return new ImageCode(image, sRand, EXPIRE_SECOND);
}

/**
* 生成随机背景条纹
*
* @param fc
* @param bc
* @return
*/
private Color getRandColor(int fc, int bc) {
Random random = new Random();
if (fc > 255) {
fc = 255;
}
if (bc > 255) {
bc = 255;
}
int r = fc + random.nextInt(bc - fc);
int g = fc + random.nextInt(bc - fc);
int b = fc + random.nextInt(bc - fc);
return new Color(r, g, b);
}
}

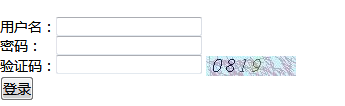
为了提升代码的可扩展性,随机验证码的生成方法generate()的方法最好是抽成接口,后期可能还有短信验证码,三方登录的验证码,这里仅做演示。上述验证码图片效果:

验证码过滤器

SpringSecurity 是通过过滤器链来进行校验的,我们想要验证图形验证码,所以可以在认证流程之前,也就是UsernamePasswordAuthenticationFilter之前进行校验。

那么自定义的验证码过滤器也需要实现j2EE的过滤器接口,同时验证方法validate()只做了内部方法抽象,后期可以做成可扩展的抽象接口,这个void方法可能会抛出异常,这里的异常设计成了spring security框架的AuthenticationException高级抽象异常的子类,为了就是保证和安全认证的异常同步,后期使用同一个失败处理器抓取AuthenticationException类型的异常即可:

1
2
3
4
5
6
7
8
9
10
11
import org.springframework.security.core.AuthenticationException;

public class MyException extends AuthenticationException {

private static final long serialVersionUID = 1L;

public MyException(String msg) {
super(msg);
}

}

而上述异常的接收者就是springboot + spring security 学习笔记(一)自定义基本使用及个性化登录配置里提到的自定义认证失败处理器。

1
2
3
4
5
6
7
8
9
10
11
12
13
14
15
16
17
18
19
20
21
22
23
24
25
26
27
28
29
30
31
32
33
34
35
36
37
38
39
40
41
42
43
44
45
46
47
48
49
50
51
52
53
54
55
56
57
58
59
60
61
62
63
64
65
66
67
68
69
70
71
72
73
74
75
76
77
78
79
80
81
82
83
84
85
86
87
88
89
90
import static org.woodwhale.king.commons.MyConstants.SESSION_KEY;

import java.io.IOException;
import java.util.Objects;

import javax.servlet.Filter;
import javax.servlet.FilterChain;
import javax.servlet.ServletException;
import javax.servlet.http.HttpServletRequest;
import javax.servlet.http.HttpServletResponse;

import org.apache.commons.lang3.StringUtils;
import org.springframework.beans.factory.annotation.Autowired;
import org.springframework.security.core.AuthenticationException;
import org.springframework.security.web.authentication.AuthenticationFailureHandler;
import org.springframework.social.connect.web.SessionStrategy;
import org.springframework.stereotype.Component;
import org.springframework.web.bind.ServletRequestBindingException;
import org.springframework.web.bind.ServletRequestUtils;
import org.springframework.web.context.request.ServletWebRequest;
import org.springframework.web.filter.OncePerRequestFilter;
import org.woodwhale.king.MyException;
import org.woodwhale.king.model.ImageCode;

import lombok.extern.slf4j.Slf4j;

@Slf4j
@Component("validateCodeFilter")
public class ValidateCodeFilter extends OncePerRequestFilter implements Filter {

/**
* 验证码校验失败处理器
*/
@Autowired
private AuthenticationFailureHandler authenticationFailureHandler;

@Autowired
private SessionStrategy sessionStrategy;

@Override
protected void doFilterInternal(HttpServletRequest request, HttpServletResponse response, FilterChain filterChain)
throws ServletException, IOException {

// 必须是登录的post请求才能进行验证,其他的直接放行
if(StringUtils.equals("/user/login", request.getRequestURI()) && StringUtils.equalsIgnoreCase(request.getMethod(), "post")) {
log.info("request : {}", request.getRequestURI());
try {
// 1. 进行验证码的校验
validate(new ServletWebRequest(request));
} catch (AuthenticationException e) {
// 2. 捕获步骤1中校验出现异常,交给失败处理类进行进行处理
authenticationFailureHandler.onAuthenticationFailure(request, response, e);
return;
}
}

// 3. 校验通过,就放行
filterChain.doFilter(request, response);

}

private void validate(ServletWebRequest request) throws ServletRequestBindingException {
// 1. 获取请求中的验证码
String codeInRequest = ServletRequestUtils.getStringParameter(request.getRequest(), "imageCode");
// 2. 校验空值情况
if(StringUtils.isEmpty(codeInRequest)) {
throw new MyException("验证码不能为空");
}

// 3. 获取服务器session池中的验证码
ImageCode codeInSession = (ImageCode) sessionStrategy.getAttribute(request, SESSION_KEY);
if(Objects.isNull(codeInSession)) {
throw new MyException("验证码不存在");
}

// 4. 校验服务器session池中的验证码是否过期
if(codeInSession.isExpried()) {
sessionStrategy.removeAttribute(request, SESSION_KEY);
throw new MyException("验证码过期了");
}

// 5. 请求验证码校验
if(!StringUtils.equals(codeInSession.getCode(), codeInRequest)) {
throw new MyException("验证码不匹配");
}

// 6. 移除已完成校验的验证码
sessionStrategy.removeAttribute(request, SESSION_KEY);
}
}

细节注意:这个过滤器继承了OncePerRequestFilter,目的在于接受 spring 的管理,它能保证我们的过滤器在一次请求中只被调用一次。

验证码过滤器配置

验证码的过滤应该在用户认证过滤之前,所以需要配置在UsernamePasswordAuthenticationFilter过滤器之前,自定义的ValidateCodeFilter过滤器由于配置了@Component("validateCodeFilter"),所以已经注入到了 spring 中,安全认证配置中直接@Autowired引用即可。

注意:因为在验证码Controller 中设置了这个/code/image请求路径,因此要做不需验证配置,将其加入到.antMatchers()中。

1
2
3
4
5
6
7
8
9
10
11
12
13
14
15
16
17
18
19
20
21
22
23
24
@Configuration
@EnableWebSecurity
public class WebSecurityConfig extends WebSecurityConfigurerAdapter {

@Autowired
private ValidateCodeFilter validateCodeFilter;

@Override
protected void configure(HttpSecurity http) throws Exception {
// 将自定义的验证码过滤器放置在 UsernamePasswordAuthenticationFilter 之前
http.addFilterBefore(validateCodeFilter, UsernamePasswordAuthenticationFilter.class)
.formLogin()
.loginPage("/login") // 设置登录页面
.loginProcessingUrl("/user/login") // 自定义的登录接口
.successHandler(myAuthenctiationSuccessHandler)
.failureHandler(myAuthenctiationFailureHandler)
.defaultSuccessUrl("/home").permitAll() // 登录成功之后,默认跳转的页面
.and().authorizeRequests() // 定义哪些URL需要被保护、哪些不需要被保护
.antMatchers("/", "/index", "/user/login", "/code/image").permitAll() // 设置所有人都可以访问登录页面
.anyRequest().authenticated() // 任何请求,登录后可以访问
.and().csrf().disable(); // 关闭csrf防护

}
}

到此,整个图片验证码的安全认证流程设计就结束了,可以再回头看看笔者最开始画的时序图,感觉还是非常不专业规范的,这里辅助说明的草稿,如笔者有设计更好的时序图,欢迎交流。

updated updated 2024-01-05 2024-01-05
本文结束感谢阅读

本文标题:SpringBoot + Spring Security 学习笔记(三)实现图片验证码认证

本文作者:

微信公号:木鲸鱼 | woodwhales

原始链接:https://woodwhales.cn/2019/04/12/028/

许可协议: 署名-非商业性使用-禁止演绎 4.0 国际 转载请保留原文链接及作者。

0%