SpringBoot + Spring Security 学习笔记(二)安全认证流程源码详解

用户认证流程

UsernamePasswordAuthenticationFilter

我们直接来看UsernamePasswordAuthenticationFilter类,

1
2
3
4
5
6
7
8
9
10
11
12
13
14
15
16
17
18
19
20
21
22
23
24
25
26
27
28
29
30
31
32
33
34
35
36
37
public class UsernamePasswordAuthenticationFilter extends
AbstractAuthenticationProcessingFilter {

public Authentication attemptAuthentication(HttpServletRequest request,
HttpServletResponse response) throws AuthenticationException {
// 判断是否是 POST 请求
if (postOnly && !request.getMethod().equals("POST")) {
throw new AuthenticationServiceException(
"Authentication method not supported: " + request.getMethod());
}

// 获取请求中的用户,密码。
// 就是最简单的:request.getParameter(xxx)
String username = obtainUsername(request);
String password = obtainPassword(request);

if (username == null) {
username = "";
}

if (password == null) {
password = "";
}

username = username.trim();

// 生成 authRequest,本质就是个 usernamePasswordAuthenticationToken
UsernamePasswordAuthenticationToken authRequest = new UsernamePasswordAuthenticationToken(
username, password);

// 把 request 请求也一同塞进 token 里
// Allow subclasses to set the "details" property
setDetails(request, authRequest);
// 将 authRequest 塞进 AuthenticationManager并返回
return this.getAuthenticationManager().authenticate(authRequest);
}
}

attemptAuthentication()方法中:主要是先进行请求判断并获取usernamepassword的值,然后再生成一个UsernamePasswordAuthenticationToken对象,将这个对象塞进AuthenticationManager对象并返回,注意:此时的authRequest的权限是没有任何值的

UsernamePasswordAuthenticationToken

不过我们可以先看看UsernamePasswordAuthenticationToken的构造方法:

1
2
3
4
5
6
public UsernamePasswordAuthenticationToken(Object principal, Object credentials) {
super(null);
this.principal = principal;
this.credentials = credentials;
setAuthenticated(false);
}

其实UsernamePasswordAuthenticationToken是继承于Authentication,该对象在学习笔记一中的中”自定义处理登录成功/失败”章节里的自定义登录成功里有提到过,它是处理登录成功回调方法中的一个参数,里面包含了用户信息、请求信息等参数。

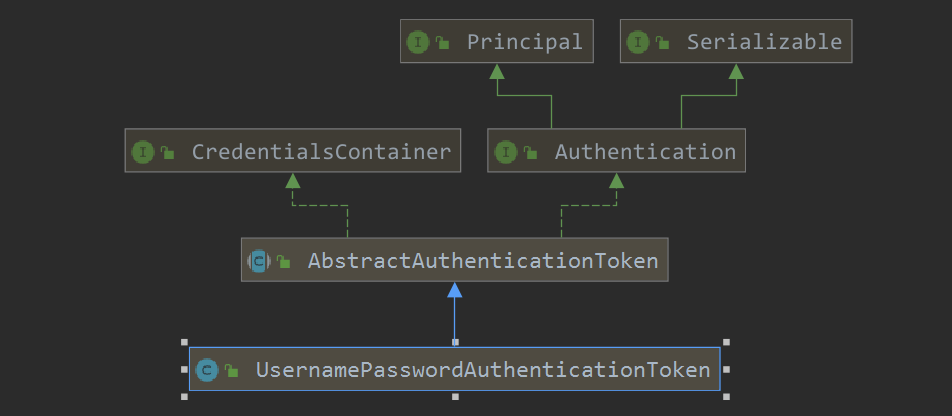
来一张继承关系图,对其有个大概的认识,注意到Authentication继承了Principal

AuthenticationManager

AuthenticationManager是一个接口,它的所有实现类如图:

其中一个十分核心的类就是:ProviderManager,在attemptAuthentication()方法最后返回的就是这个类

1
this.getAuthenticationManager().authenticate(authRequest);

进入authenticate()方法查看具体做了什么:

1
2
3
4
5
6
7
8
9
10
11
12
13
14
15
16
17
18
19
20
21
22
23
24
25
26
27
28
29
30
31
32
33
34
35
36
public Authentication authenticate(Authentication authentication)
throws AuthenticationException {
Class<? extends Authentication> toTest = authentication.getClass();
AuthenticationException lastException = null;
AuthenticationException parentException = null;
Authentication result = null;
Authentication parentResult = null;
boolean debug = logger.isDebugEnabled();

for (AuthenticationProvider provider : getProviders()) {
// 1.判断是否有provider支持该Authentication
if (!provider.supports(toTest)) {
continue;
}

if (debug) {
logger.debug("Authentication attempt using "
+ provider.getClass().getName());
}

try {
// 2. 真正的逻辑判断
result = provider.authenticate(authentication);

if (result != null) {
copyDetails(authentication, result);
break;
}
}
catch (AccountStatusException e) {
……
}
}

……
}

这里首先通过 provider 判断是否支持当前传入进来的Authentication,目前我们使用的是UsernamePasswordAuthenticationToken,因为除了帐号密码登录的方式,还会有其他的方式,比如JwtAuthenticationToken

从整体来看Authentication 的实现类如图:
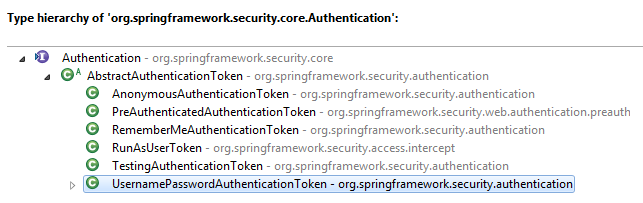
官方 API 文档列出了所有的子类

从整体来看AuthenticationProvider的实现类如图:
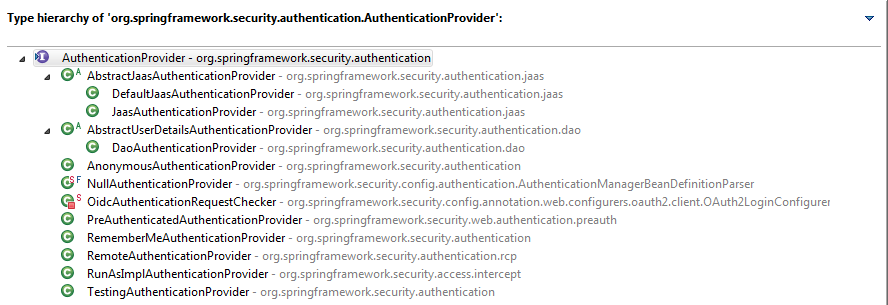
官方 API 文档列出了所有的子类

根据我们目前所使用的UsernamePasswordAuthenticationToken,provider 对应的是AbstractUserDetailsAuthenticationProvider抽象类的子类DaoAuthenticationProvider,其authenticate()属于抽象类本身的方法。

1
2
3
4
5
6
7
8
9
10
11
12
13
14
15
16
17
18
19
20
21
22
23
24
25
26
27
28
29
30
31
32
33
34
35
36
37
38
39
40
41
42
43
44
45
46
47
48
49
50
51
52
53
54
55
56
57
58
59
60
61
62
public Authentication authenticate(Authentication authentication)
throws AuthenticationException {
Assert.isInstanceOf(UsernamePasswordAuthenticationToken.class, authentication,
() -> messages.getMessage(
"AbstractUserDetailsAuthenticationProvider.onlySupports",
"Only UsernamePasswordAuthenticationToken is supported"));

// Determine username
String username = (authentication.getPrincipal() == null) ? "NONE_PROVIDED"
: authentication.getName();

boolean cacheWasUsed = true;
// 1.从缓存中获取 UserDetails
UserDetails user = this.userCache.getUserFromCache(username);

if (user == null) {
cacheWasUsed = false;

try {
// 2.缓存获取不到,就去接口实现类中获取
user = retrieveUser(username,
(UsernamePasswordAuthenticationToken) authentication);
}
catch (UsernameNotFoundException notFound) {
……
}

Assert.notNull(user,
"retrieveUser returned null - a violation of the interface contract");
}

try {
// 3.用户信息预检查(用户是否密码过期,用户信息被删除等)
preAuthenticationChecks.check(user);
// 4.附加的检查(密码检查:匹配用户的密码和服务器中的用户密码是否一致)
additionalAuthenticationChecks(user,
(UsernamePasswordAuthenticationToken) authentication);
}
catch (AuthenticationException exception) {
if (cacheWasUsed) {
// There was a problem, so try again after checking
// we're using latest data (i.e. not from the cache)
cacheWasUsed = false;
user = retrieveUser(username,
(UsernamePasswordAuthenticationToken) authentication);
preAuthenticationChecks.check(user);
additionalAuthenticationChecks(user,
(UsernamePasswordAuthenticationToken) authentication);
}
else {
throw exception;
}
}

// 5.最后的检查
postAuthenticationChecks.check(user);

……

// 6.返回真正的经过认证的Authentication
return createSuccessAuthentication(principalToReturn, authentication, user);
}

注意:retrieveUser()的具体方法实现是由DaoAuthenticationProvider类完成的:

1
2
3
4
5
6
7
8
9
10
11
12
13
14
15
16
17
18
19
20
public class DaoAuthenticationProvider extends AbstractUserDetailsAuthenticationProvider {	

protected final UserDetails retrieveUser(String username,
UsernamePasswordAuthenticationToken authentication)
throws AuthenticationException {
prepareTimingAttackProtection();
try {
// 获取用户信息
UserDetails loadedUser = this.getUserDetailsService().loadUserByUsername(username);
if (loadedUser == null) {
throw new InternalAuthenticationServiceException(
"UserDetailsService returned null, which is an interface contract violation");
}
return loadedUser;
}
catch (UsernameNotFoundException ex) {
……
}
}
}

同时createSuccessAuthentication()的方法也是由DaoAuthenticationProvider类来完成的:

1
2
3
4
5
6
7
8
9
10
11
12
13
14
15
16
17
18
19
20
21
22
23
24
25
// 子类拿 user 对象
@Override
protected Authentication createSuccessAuthentication(Object principal,
Authentication authentication, UserDetails user) {
boolean upgradeEncoding = this.userDetailsPasswordService != null
&& this.passwordEncoder.upgradeEncoding(user.getPassword());
if (upgradeEncoding) {
String presentedPassword = authentication.getCredentials().toString();
String newPassword = this.passwordEncoder.encode(presentedPassword);
user = this.userDetailsPasswordService.updatePassword(user, newPassword);
}
// 调用父类的方法完成 Authentication 的创建
return super.createSuccessAuthentication(principal, authentication, user);
}

// 创建已认证的 Authentication
protected Authentication createSuccessAuthentication(Object principal,
Authentication authentication, UserDetails user) {
UsernamePasswordAuthenticationToken result = new UsernamePasswordAuthenticationToken(
principal, authentication.getCredentials(),
authoritiesMapper.mapAuthorities(user.getAuthorities()));
result.setDetails(authentication.getDetails());

return result;
}

小结:authenticate()的认证逻辑

  1. 去调用自己实现的UserDetailsService,返回UserDetails
  2. 对 UserDetails 的信息进行校验,主要是帐号是否被冻结,是否过期等
  3. 对密码进行检查,这里调用了PasswordEncoder,检查 UserDetails 是否可用。
  4. 返回经过认证的Authentication

编码技巧提示:这里在认证之前使用了Assert.isInstanceOf()进行断言校验,方法内部也不断用了Assert.notNull(),这种编码非常的灵巧,省去了后续的类型判断。

这里的两次对UserDetails的检查,主要就是通过它的四个返回 boolean 类型的方法(isAccountNonExpired()isAccountNonLocked()isCredentialsNonExpired()isEnabled())。

经过信息的校验之后,通过UsernamePasswordAuthenticationToken的全参构造方法,返回了一个已经过认证的Authentication

拿到经过认证的Authentication之后,至此UsernamePasswordAuthenticationFilter的过滤步骤就完全结束了,之后就会进入BasicAuthenticationFilter,具体来说就是去调用successHandler。或者未通过认证,去调用failureHandler

已认证数据共享

完成了用户认证处理流程之后,我们思考一下是如何在多个请求之间共享这个认证结果的呢?因为没有做关于这方面的配置,所以可以联想到默认的方式应该是在session中存入了认证结果。思考:那么是什么时候存放入session中的呢?

认证流程完毕之后,再看是谁调用的它,发现是AbstractAuthenticationProcessingFilterdoFilter()进行调用的,这是AbstractAuthenticationProcessingFilter继承关系结构图:

当认证成功之后会调用successfulAuthentication(request, response, chain, authResult),该方法中,不仅调用了successHandler,还有一行比较重要的代码:

1
2
3
4
5
6
7
8
9
10
11
12
13
14
15
16
17
18
19
20
21
22
23
24
25
26
27
28
29
30
31
32
33
34
35
36
37
38
39
40
41
42
43
44
45
46
47
public abstract class AbstractAuthenticationProcessingFilter extends GenericFilterBean
implements ApplicationEventPublisherAware, MessageSourceAware {
public void doFilter(ServletRequest req, ServletResponse res, FilterChain chain)
throws IOException, ServletException {
// 调用了 UsernamePasswordAuthenticationFilter
authResult = attemptAuthentication(request, response);

……
// 调用方法,目的是保存到session
successfulAuthentication(request, response, chain, authResult);
}

// 将成功认证的用户信息保存到session
protected void successfulAuthentication(HttpServletRequest request,
HttpServletResponse response, FilterChain chain, Authentication authResult)
throws IOException, ServletException {

if (logger.isDebugEnabled()) {
logger.debug("Authentication success. Updating SecurityContextHolder to contain: "
+ authResult);
}

// 保存到 SecurityContextHolder 的静态属性 SecurityContextHolderStrategy 里, 非常重要的代码
SecurityContextHolder.getContext().setAuthentication(authResult);

rememberMeServices.loginSuccess(request, response, authResult);

// Fire event
if (this.eventPublisher != null) {
eventPublisher.publishEvent(new InteractiveAuthenticationSuccessEvent(
authResult, this.getClass()));
}

successHandler.onAuthenticationSuccess(request, response, authResult);
}
}

// SecurityContextHolder类中存着 静态属性:SecurityContextHolderStrategy
public class SecurityContextHolder {
……
private static SecurityContextHolderStrategy strategy;
……

public static void setContext(SecurityContext context) {
strategy.setContext(context);
}
}

SecurityContextHolderStrategy接口的所有实现类:

非常显眼的看出:ThreadLocalSecurityContextHolderStrategy类:

1
2
3
4
5
6
7
8
9
10
11
12
13
14
final class ThreadLocalSecurityContextHolderStrategy implements
SecurityContextHolderStrategy {

private static final ThreadLocal<SecurityContext> contextHolder = new ThreadLocal<>();

……

public void setContext(SecurityContext context) {
Assert.notNull(context, "Only non-null SecurityContext instances are permitted");
// 将已认证的用户对象保存到 ThreadLocal<SecurityContext> 中
contextHolder.set(context);
}
……
}

注意:SecurityContext类的equals()hashCode()方法已经重写了,用来保证了authentication的唯一性。

身份认证成功后,最后在UsernamePasswordAuthenticationFilter返回后会进入一个AbstractAuthenticationProcessingFilter类中调用successfulAuthentication()方法,这个方法最后会返回我们自己定义的登录成功处理器handler

在返回之前,它会调用SecurityContext,最后将认证的结果放入SecurityContextHolder中,SecurityContext 类很简单,重写了equals() 方法和hashCode()方法,保证了authentication的唯一性。

从代码可以看出:SecurityContextHolder类实际上是对ThreadLocal的一个封装,可以在不同方法之间进行通信,可以简单理解为线程级别的一个全局变量。

因此,可以在同一个线程中的不同方法中获取到认证信息。最后会被SecurityContextPersistenceFilter过滤器使用,这个过滤器的作用是:

当一个请求来的时候,它会将 session 中的值传入到该线程中,当请求返回的时候,它会判断该请求线程是否有 SecurityContext,如果有它会将其放入到 session 中,因此保证了请求结果可以在不同的请求之间共享。

用户认证流程总结

引用徐靖峰在个人博客Spring Security(一)–Architecture Overview中的概括性总结,非常的到位:

  1. 用户名和密码被过滤器获取到,封装成Authentication,通常情况下是UsernamePasswordAuthenticationToken这个实现类。
  2. AuthenticationManager 身份管理器负责验证这个Authentication
  3. 认证成功后,AuthenticationManager身份管理器返回一个被填充满了信息的(包括上面提到的权限信息,身份信息,细节信息,但密码通常会被移除)Authentication实例。
  4. SecurityContextHolder安全上下文容器将第3步填充了信息的Authentication,通过SecurityContextHolder.getContext().setAuthentication(…)方法,设置到其中。

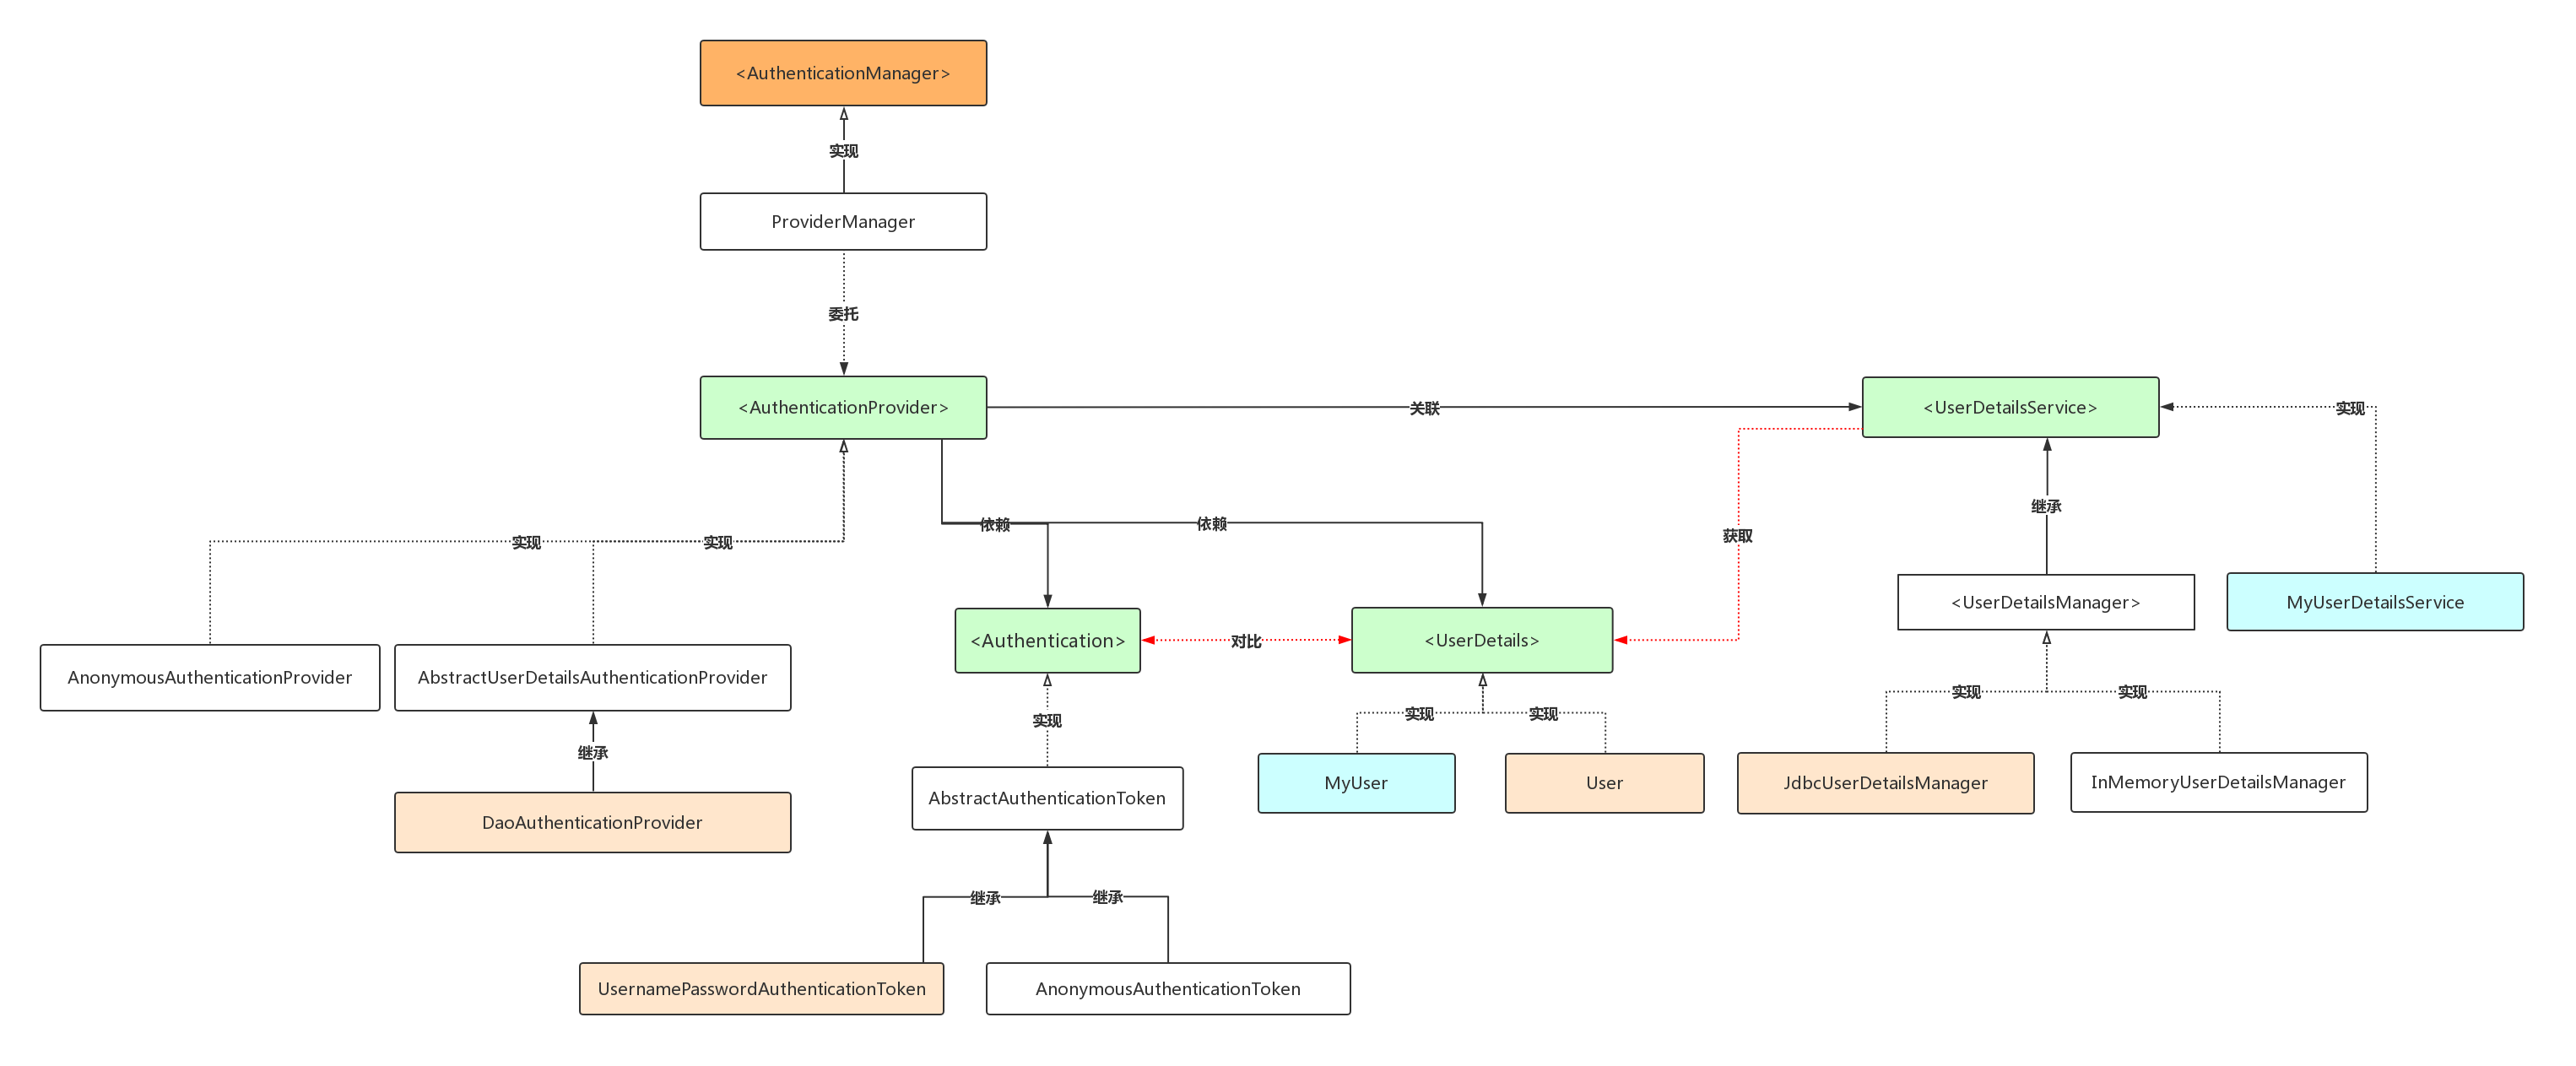
高度概括起来本章节所有用的核心认证相关接口:SecurityContextHolder

身份信息的存放容器,Authentication是身份信息的抽象,AuthenticationManager是身份认证器,一般常用的是用户名+密码的身份认证器,还有其它认证器,如邮箱+密码、手机号码+密码等。

再引用一张十分流行的流程图来表示用户的认证过程:
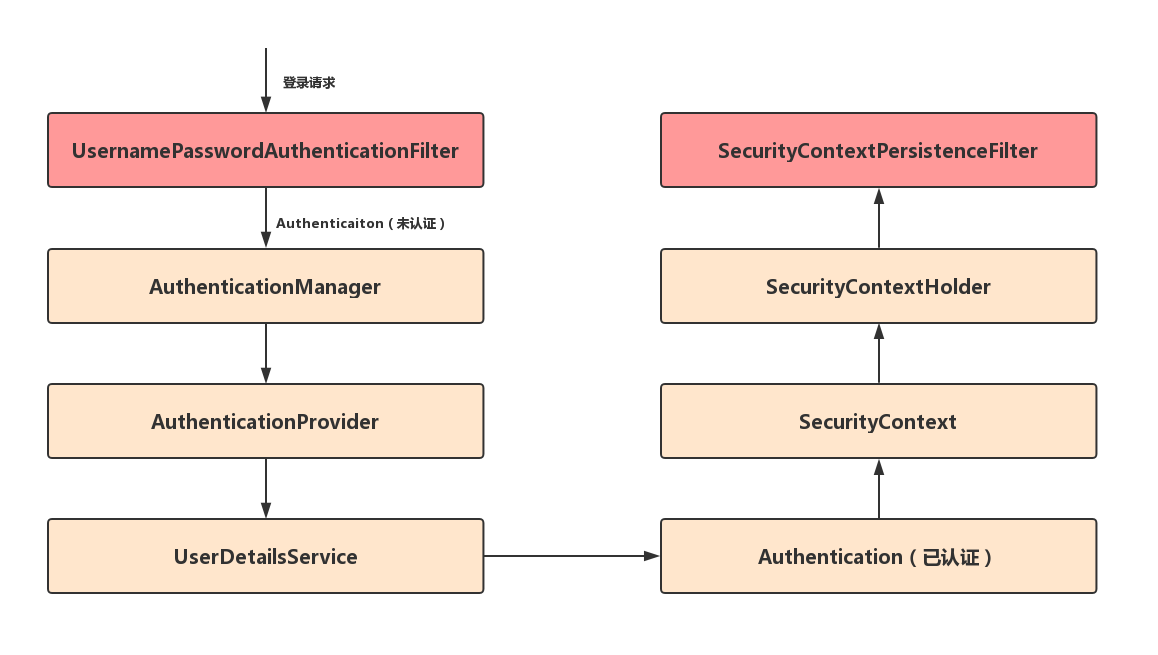
架构概览图

为了更加形象的理解,在徐靖峰大佬的经典架构图之上,根据自己的理解,做了更多的细化和调整:

获取认证用户信息

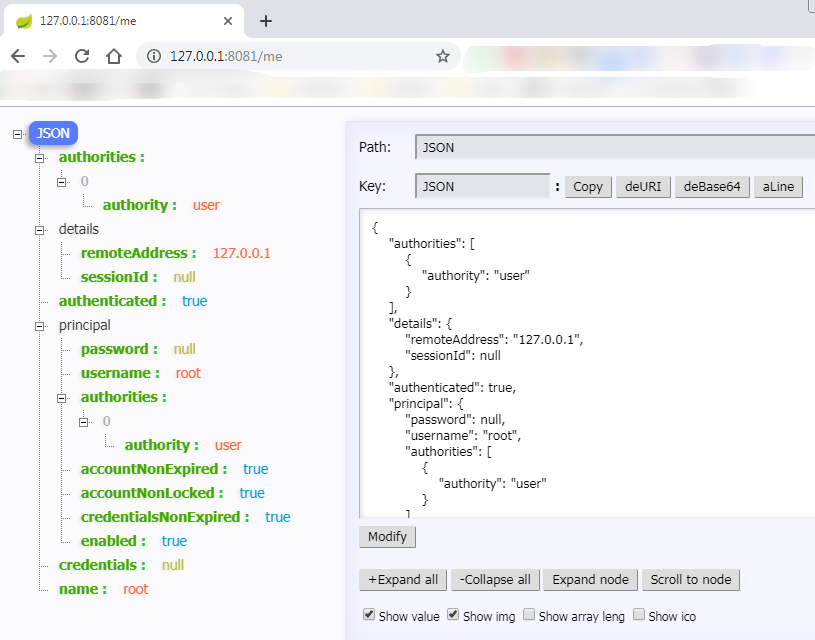
如果我们需要获取用的校验过的所有信息,该如何获取呢?上面我们知道了会将校验结果放入 session 中,因此,我们可以通过 session 获取:

1
2
3
4
5
6
7
8
9
10
11
@GetMapping("/me1")
@ResponseBody
public Object getMeDetail() {
return SecurityContextHolder.getContext().getAuthentication();
}

@GetMapping("/me2")
@ResponseBody
public Object getMeDetail(Authentication authentication){
return authentication;
}

在登录成功之后,上面有两种方式来获取,访问上面的请求,就会获取用户全部的校验信息,包括ip地址等信息。

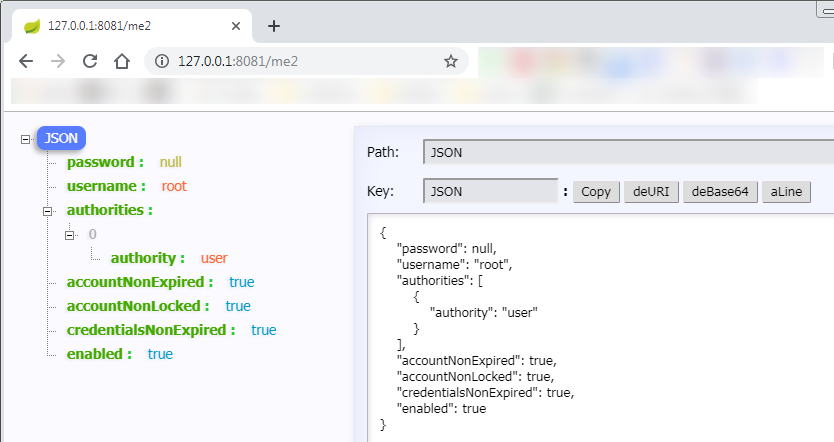
如果我们只想获取用户名和密码以及它的权限,不需要ip地址等太多的信息可以使用下面的方式来获取信息:

1
2
3
4
5
@GetMapping("/me3")
@ResponseBody
public Object getMeDetail(@AuthenticationPrincipal UserDetails userDetails){
return userDetails;
}

参考资料:

https://www.cnkirito.moe/spring-security-1/

https://blog.csdn.net/u013435893/article/details/79605239

https://blog.csdn.net/qq_37142346/article/details/80032336

updated updated 2024-01-05 2024-01-05
本文结束感谢阅读

本文标题:SpringBoot + Spring Security 学习笔记(二)安全认证流程源码详解

本文作者:

微信公号:木鲸鱼 | woodwhales

原始链接:https://woodwhales.cn/2019/04/12/027/

许可协议: 署名-非商业性使用-禁止演绎 4.0 国际 转载请保留原文链接及作者。

0%