1. 初识Spring Jpa Data
1.1 环境准备
创建maven工程,项目继承spring-boot-starter-parent,只需要引入spring-boot-starter-data-jpa即可:
1 | <parent> |
1.2 数据库连接配置
在application.yml配置文件中,配置数据库源信息和jpa基础配置:
1 | spring: |
1.3 数据库连接测试
首先在数据库中创建jpa-study数据库:
1 | CREATE DATABASE `jpa-study` /*!40100 COLLATE 'utf8mb4_unicode_ci' */ |
编写数据连接测试方法:
1 |
|
启动运行,不报异常表示数据库连接正常。
1.4 创建表对象
编写Person类,这个类对应数据库表为:JPA_PERSONS
1 | import lombok.AllArgsConstructor; |
再次运行测试类,此时数据库创建了JPA_PERSONS表,使用heidisql工具查看数据库:
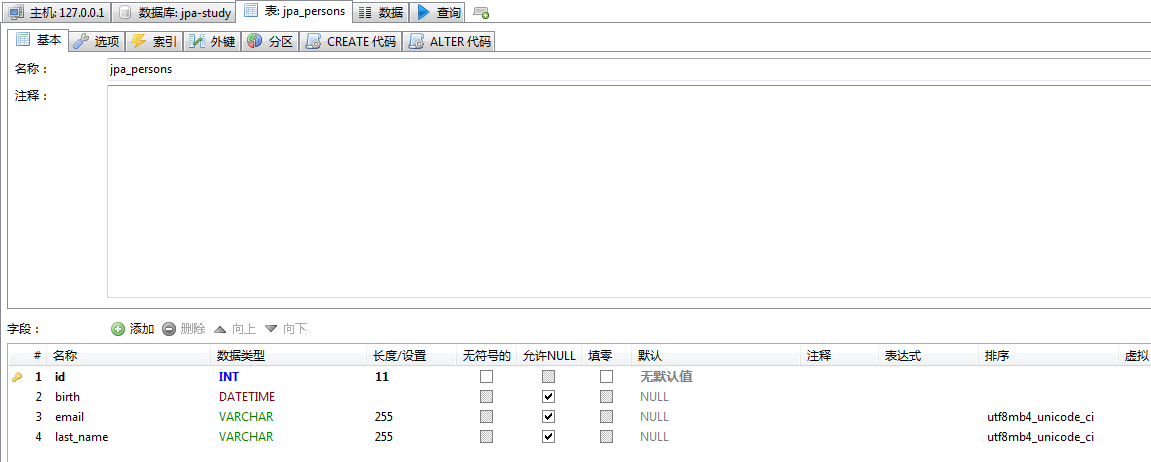
注意:在主键属性上加了@GeneratedValue注解,则会在创建表的时候生成一张hibernate_sequence表。
1.5 编写dao接口
编写Person对象的数据库操作接口,并继承Repository<T, ID>,其中需要指定当前数据对象的类型和主键类型,并在接口中编写save()方法:
1 | import org.springframework.data.repository.Repository; |
此时PersonDao接口已经具备了保存数据的能力了。
注意:经过测试,这个自定义的
save()方法如果写了返回类型是Long、Integer或boolean,那么在数据执行完毕之后,会抛出异常java.lang.ClassCastException,但是数据会保存到数据库中,所以要注意异常情况增加事务。
编写测试方法测试:
1 |
|
从执行日志可以看出,数据已经成功保存到数据库:
1 | Hibernate: select person0_.id as id1_0_0_, person0_.birth as birth2_0_0_, person0_.email as email3_0_0_, person0_.last_name as last_nam4_0_0_ from jpa_persons person0_ where person0_.id=? |
再到数据库中直接检查一下:

再次在接口中编写根据id查询数据方法:
1 | Person getById(Integer id); |
测试:
1 |
|
执行日志可以看到,顺利查询出数据:
1 | Hibernate: select person0_.id as id1_0_, person0_.birth as birth2_0_, person0_.email as email3_0_, person0_.last_name as last_nam4_0_ from jpa_persons person0_ where person0_.id=? |
2. 认识Repository接口
2.1 Repository是标记接口
点击Repository接口源码可以看到,这个接口就是一个空接口,从上述测试的结果可以得出:
- Repository 接口是一个空接口,也就是一个标记接口。
- 如果程序员自己定义的接口继承了这个 Repository 接口,那么这个自定义接口也会被加载到 spring ioc 容器中(因为使用@Autowired 拿到了这个接口,并成功执行了测试方法,所以一定被纳进了容器中),并且编写一定规则的方法,都是可以执行相应的数据库操作。
- 实际上, 也可以通过
@RepositoryDefinition注解来替代继承 Repository 接口
形如:
1 | import org.springframework.data.repository.RepositoryDefinition; |
2.2 Repository接口的实现类/子接口
在 IDEA 编辑器中,按快捷键ctrl+H查看 Repository 接口的实现类:
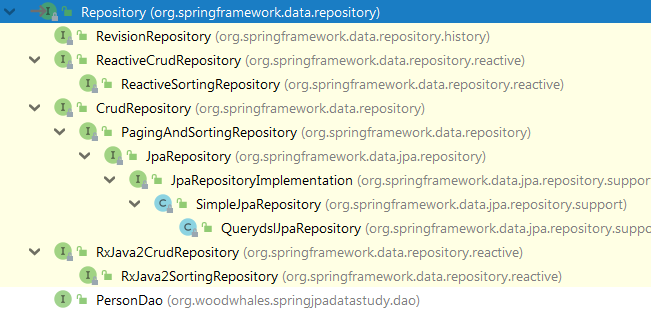
从继承关系图中可以看出:
基础的 Repository 提供了最基本的数据访问功能,其几个子接口则扩展了一些功能。它们的继承关系如下:
Repository: 仅仅是一个标识,表明任何继承它的均为仓库接口类
CrudRepository: 继承 Repository,实现了一组 CRUD 相关的方法
PagingAndSortingRepository: 继承 CrudRepository,实现了一组分页排序相关的方法
JpaRepository: 继承 PagingAndSortingRepository,实现一组 JPA 规范相关的方法
自定义的 XxxxRepository 需要继承 JpaRepository,这样的 XxxxRepository 接口就具备了通用的数据访问控制层的能力。
JpaSpecificationExecutor: 不属于Repository体系,实现一组 JPA Criteria 查询相关的方法,用于条件查询。
2.3 方法定义规则
在 Repository 子接口中声明方法,不是随便声明的,而需要符合一定的规范:
查询方法以 find | read | get 开头。
涉及条件查询时,条件的属性用条件关键字连接。
要注意的是:条件属性以首字母大写。
支持属性的级联查询,如果当前类有符合条件的属性,则优先使用这个属性,而不使用级联属性。
如果想要使用级联查询,需要在属性之间使用下划线分割
直接在接口中定义查询方法,如果是符合规范的,可以不用写实现,目前支持的关键字写法如下:
| Keyword | Sample | JPQL snippet |
|---|---|---|
| And | findByLastnameAndFirstname | … where x.lastname = ?1 and x.firstname = ?2 |
| Or | findByLastnameOrFirstname | … where x.lastname = ?1 or x.firstname = ?2 |
| Is,Equals | findByFirstname,findByFirstnameIs,findByFirstnameEquals | … where x.firstname = ?1 |
| Between | findByStartDateBetween | … where x.startDate between ?1 and ?2 |
| LessThan | findByAgeLessThan | … where x.age < ?1 |
| LessThanEqual | findByAgeLessThanEqual | … where x.age <= ?1 |
| GreaterThan | findByAgeGreaterThan | … where x.age > ?1 |
| GreaterThanEqual | findByAgeGreaterThanEqual | … where x.age >= ?1 |
| After | findByStartDateAfter | … where x.startDate > ?1 |
| Before | findByStartDateBefore | … where x.startDate < ?1 |
| IsNull | findByAgeIsNull | … where x.age is null |
| IsNotNull,NotNull | findByAge(Is)NotNull | … where x.age not null |
| Like | findByFirstnameLike | … where x.firstname like ?1 |
| NotLike | findByFirstnameNotLike | … where x.firstname not like ?1 |
| StartingWith | findByFirstnameStartingWith | … where x.firstname like ?1(parameter bound with appended %) |
| EndingWith | findByFirstnameEndingWith | … where x.firstname like ?1(parameter bound with prepended %) |
| Containing | findByFirstnameContaining | … where x.firstname like ?1(parameter bound wrapped in %) |
| OrderBy | findByAgeOrderByLastnameDesc | … where x.age = ?1 order by x.lastname desc |
| Not | findByLastnameNot | … where x.lastname <> ?1 |
| In | findByAgeIn(Collection |
… where x.age in ?1 |
| NotIn | findByAgeNotIn(Collection |
… where x.age not in ?1 |
| True | findByActiveTrue() | … where x.active = true |
| False | findByActiveFalse() | … where x.active = false |
| IgnoreCase | findByFirstnameIgnoreCase | … where UPPER(x.firstame) = UPPER(?1) |
官方文档地址:https://docs.spring.io/spring-data/jpa/docs/current/reference/html/#jpa.query-methods.query-creation
定义规则举例
查询 id 小于 xx 并且 lastName 以 xx 开头的所有数据:
使用 JPQL 表达式表示就是:
1 | WHERE lastName LIKE ?% AND id < ? |
方法命名规则:
1 | List<Person> getByLastNameStartingWithAndIdLessThan(String lastName, Integer id); |
依次类推,查询 id 小于 xx 并且 lastName 以 xx 结尾的所有数据:
1 | //WHERE lastName LIKE %? AND id < ? |
类似的写法:
1 | //WHERE email IN (?, ?, ?) OR birth < ? |
级联属性规则说明
比如 Person 对象属性中有个 Address 对象属性,一个 Person 对应多个 Address 对象,如果想要级联查询,查询地址的 id 大于某某的数据,则可以写成:
1 | //WHERE address.id > ? |
但是这里有个潜在的问题,当前 Person 对象有个叫 address 属性名的字段,而没有属性叫 addressId 的属性字段,那么查询的时候,就是先查 address 再级联到 address 的 id 的数据。
如果当前 Person 对象有个叫 addressId 的属性字段,那么在执行查询的时候,就是直接查了 addressId,而不是级联查询了。
因此为了防止歧义,对于级联的属性条件,中间需要加下划线区别:
1 | List<Person> getByAddress_IdGreaterThan(Integer id); |
说明:其实级联查询即使使用了下划线,也很难以阅读理解,所以建议复杂的查询全部使用原生的sql。
3. @Query注解
通过@Query注解,注解在方法上,编写自定义原生的sql或者JPQL语句,这里还是建议写原生的sql语句,因为在数据库中查询再拷贝到注解上,不需要改动很大,调试起来也很方便。
以下是JPQL语句的查询:
1 |
|
3.1 占位符
索引参数如下所示,索引值从1开始,查询中 ”?X” 个数需要与方法定义的参数个数相一致,并且顺序也要一致:
1 |
|
命名参数(推荐使用这种方式):可以定义好参数名,赋值时采用@Param注解,而不用管顺序:
1 |
|
SpringData 允许在占位符上添加 %%:
1 | //SpringData 允许在占位符上添加 %%. |
3.2 支持原生SQL
设置nativeQuery=true即可以使用原生的 SQL 查询:
1 |
|
4. @Modifying注解
@Query与@Modifying这两个注解一起声明,可定义个性化更新操作,例如只涉及某些字段更新时最为常用,示例如下:
1 |
|
注意:
方法的返回值应该是 int,表示更新语句所影响的行数
在调用的地方必须加事务,没有事务不能正常执行
Spring Data 提供了默认的事务处理方式,即所有的查询均声明为只读事务。对于自定义的方法,如需改变
Spring Data 提供的事务默认方式,可以在方法上注解@Transactional声明。
因此,对于update和delete操作,需要添加@Modifying注解,service 调用这些方法的时候需要申明事务。
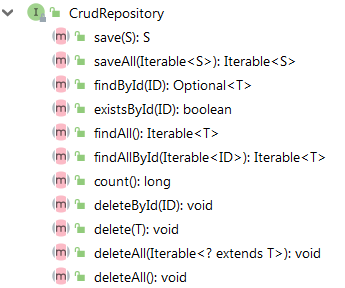
5. CrudRepository接口
CrudRepository 接口提供了最基本的对实体类的添删改查操作,IDEA 编辑器中按快捷键alt+7显示 CrudRepository 接口的所有方法:
6. PagingAndSortingRepository接口
PagingAndSortingRepository 接口该接口提供了分页与排序功能,开发中常用的是第二个方法:
1 | public interface PagingAndSortingRepository<T, ID> extends CrudRepository<T, ID> { |
Pageable 接口的实现类为 PageRequest,在构造函数中传入页码和页数,注意的是默认页码是从 0 页开始。一般在开发中,前端传参过来的页码是从第 1 页开始的,所以创建 PageRequest 对象的时候注意减1。
1 | import org.springframework.data.domain.Page; |
Order 排序对象,里面传参是数据库表中的列名。
7. JpaRepository接口
在实际开发中,自定义的接口一般继承的就是这个,而不是 Repository 这个空接口。
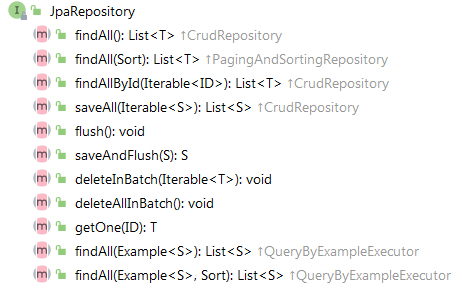
其中saveAndFlush()表示强制执行持久化操作,返回的对象和传参对象不是同一个对象。
1 |
|
返回结果是false,表示执行之后,创建了新的对象。
8. JpaSpecificationExecutor接口
JpaSpecificationExecutor 接口不属于Repository体系,实现一组 JPA Criteria 查询相关的方法:
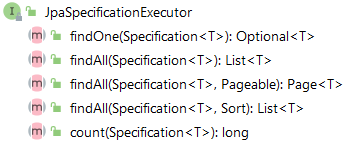
Specification:封装 JPA Criteria 查询条件。通常使用匿名内部类的方式来创建该接口的对象。
举例:实现带查询条件的分页,并且查询 id > 5 的数据,使用 JpaSpecificationExecutor 接口的JpaSpecificationExecutor 的 Page<T> findAll(Specification<T> spec, Pageable pageable)方法:
1 |
|
Jpa条件查询最佳实践
当有多个条件查询时,需要创建多个 Predicate 对象,并将这些 Predicate 对象并联起来,因此可以定义一个createSpecification(Map searchMap)方法,用来创建最终的 Specification 对象,以下是伪代码:
1 | /** |
代码解释:比如传参 searchMap 中存了{“name”:”woodwhales”}的键值对,那么将该对象的所有属性当作key对这个map依次获取一遍,能获取到的key 就表示当前属性需要条件查询,创建条件对象并放入集合中。最后将所有条件对象并联返回。
简单概述就是,将传过来的map中的键值对,依次和当前对象属性比对,有值的就是要条件查询的。
9. 自定义Repository接口
步骤1:定义一个接口:声明要添加的,并自实现的方法
步骤2:提供该接口的实现类:类名需在要声明的 Repository 后添加 Impl,并实现方法
步骤3:声明 Repository 接口,并继承步骤1 声明的接口。
三步完成之后,就可以使用自定义的接口了。
例如:
步骤1:自定义Repository接口名称为:PersonRepsotory,里面有个test()方法:
1 | public interface PersonRepsotory { |
步骤2:实现自定义接口,注意实现类必须是接口名+Impl后缀的类名:
1 | import javax.persistence.EntityManager; |
注意:默认情况下,Spring Data 会在 base-package 中查找 “接口名Impl” 作为实现类。也可以通过repository-impl-postfix声明后缀。
步骤3:在真正的业务接口中继承自定义的接口,此时当前 PersonDao 接口就具有了自定义接口里面的方法了:
1 | public interface PersonDao extends JpaRepository<Person, Integer>, JpaSpecificationExecutor<Person>, PersonRepsotory { |
参考资料: