Spring 注解驱动开发之组件注册

1. 注解驱动开发

当我们还在使用Spring、SpringMVC、Mybatis三大框架来整合开发的时候,我们会写大量的xml文件来进行配置。然而在Springboot和SpringCloud兴起之后,学习Spring的注解驱动及其原理那将会是非常有必要的了,因为在Springboot和SpringCloud里面会使用到大量的注解来进行配置;当我们熟练掌握了Spring的注解驱动,那当我们在学习Springboot和SpringCloud框架的时候,那将会更加的轻松自如。

1.1 环境准备

这里使用spring-context来演示工程demo,pom 依赖如下:

1
2
3
4
5
6
7
8
9
10
11
12
13
14
15
16
17
18
19
20
21
22
23
24
25
26
27
28
29
30
31
32
33
34
35
36
37
38
39
<properties>
<project.build.sourceEncoding>UTF-8</project.build.sourceEncoding>
<maven.compiler.source>1.8</maven.compiler.source>
<maven.compiler.target>1.8</maven.compiler.target>
</properties>

<dependencies>
<dependency>
<groupId>org.projectlombok</groupId>
<artifactId>lombok</artifactId>
<version>1.18.8</version>
<scope>provided</scope>
</dependency>
<dependency>
<groupId>org.springframework</groupId>
<artifactId>spring-context</artifactId>
<version>5.1.8.RELEASE</version>
</dependency>
<dependency>
<groupId>javax.inject</groupId>
<artifactId>javax.inject</artifactId>
<version>1</version>
</dependency>
<dependency>
<groupId>junit</groupId>
<artifactId>junit</artifactId>
<version>4.12</version>
<scope>test</scope>
</dependency>
</dependencies>

<build>
<plugins>
<plugin>
<groupId>org.springframework.boot</groupId>
<artifactId>spring-boot-maven-plugin</artifactId>
</plugin>
</plugins>
</build>

2. 组件注册

创建一个Person类:

1
2
3
4
5
6
7
8
9
10
@Data
@NoArgsConstructor
@AllArgsConstructor
public class Person {

private String name;

private Integer age;

}

2.1 xml方式注册

创建一个 xml 配置文件,用于注册这个 Person 对象:

1
2
3
4
5
6
7
8
9
10
11
12
13
14
15
16
17
<?xml version="1.0" encoding="UTF-8"?>
<beans xmlns="http://www.springframework.org/schema/beans"
xmlns:xsi="http://www.w3.org/2001/XMLSchema-instance"
xmlns:context="http://www.springframework.org/schema/context"
xmlns:aop="http://www.springframework.org/schema/aop"
xmlns:tx="http://www.springframework.org/schema/tx"
xsi:schemaLocation="http://www.springframework.org/schema/beans http://www.springframework.org/schema/beans/spring-beans.xsd
http://www.springframework.org/schema/context http://www.springframework.org/schema/context/spring-context-4.3.xsd
http://www.springframework.org/schema/aop http://www.springframework.org/schema/aop/spring-aop-4.3.xsd
http://www.springframework.org/schema/tx http://www.springframework.org/schema/tx/spring-tx-4.3.xsd">

<bean id="person" class="org.woodwhale.king.code01.Person">
<property name="age" value="20"></property>
<property name="name" value="zhangsan"></property>
</bean>

</beans>

使用ClassPathXmlApplicationContext加载这个配置文件:

1
2
3
4
5
6
@Test
public void testLoadXml() {
ApplicationContext applicationContext = new ClassPathXmlApplicationContext("beans.xml");
Person person = (Person) applicationContext.getBean("person");
System.out.println(person);
}

输出结果:

Person(name=zhangsan, age=20)

2.2 注解方式注册

使用注解的方式进行加载 bean,就需要编写一个配置类,等同于 xml 配置文件:

  • @Bean:相当于xml配置文件中的<bean>标签,告诉容器注册一个bean

  • 之前xml文件中<bean>标签有bean的class类型,那么现在注解方式的类型当然也就是返回值的类型

  • 之前xml文件中<bean>标签有bean的id,现在注解的方式默认用的是方法名来作为bean的id,也就是说当前注解的方法名是person(),那么id 就是person,如果方法名是person01(),那么id 就是person01

1
2
3
4
5
6
7
8
@Configuration
public class AppConfig {

@Bean
public Person person() {
return new Person("lisi", 20);
}
}

如果通过@Bean注解的value属性显式指定 bean 在 IOC 容器的id,那么就会以这个指定的id 为准注入容器中:

1
2
3
4
5
6
7
8
@Configuration
public class AppConfig {

@Bean("person")
public Person person01() {
return new Person("king", 22);
}
}

使用AnnotationConfigApplicationContext加载这个配置类:

1
2
3
4
5
6
7
8
9
10
11
12
13
14
15
16
@Test
public void testLoadAnnotation() {
ApplicationContext applicationContext = new AnnotationConfigApplicationContext(AppConfig.class);
Person person = applicationContext.getBean(Person.class);
System.out.println(person);

// 遍历所有 Person 类型的 bean 的id
printBeanName(applicationContext, Person.class);
}

private void printBeanName(ApplicationContext applicationContext, Class clazz) {
String[] beanNames = applicationContext.getBeanDefinitionNames();
for (String beanName : beanNames) {
System.out.println(beanName);
}
}

输出结果:

Person(name=king, age=22)
org.springframework.context.annotation.internalConfigurationAnnotationProcessor
org.springframework.context.annotation.internalAutowiredAnnotationProcessor
org.springframework.context.annotation.internalCommonAnnotationProcessor
org.springframework.context.event.internalEventListenerProcessor
org.springframework.context.event.internalEventListenerFactory
appConfig
person

从输出结果可以看到:配置类也作为了 bean 注入容器中,当使用@Bean 注解显示指定id 的时候,注册到容器中就是这个指定的id。
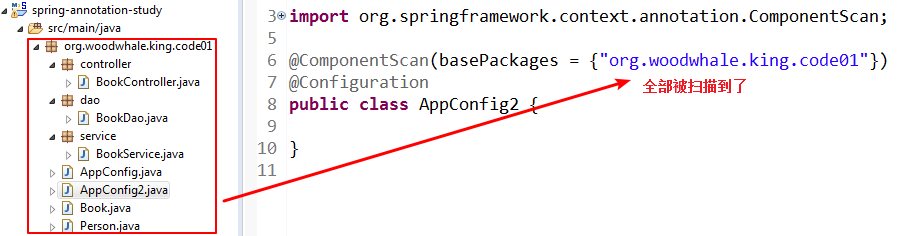
2.3 组件自动扫描组件

在xml文件配置的方式,我们可以这样来进行配置:

1
2
<!-- 包扫描、只要标注了@Controller、@Service、@Repository,@Component -->
<context:component-scan base-package="org.woodwhale.king.code01"/>

以前是在xml配置文件里面写包扫描,现在我们可以在配置类里面写包扫描:

1
2
3
4
5
@ComponentScan(basePackages = {"org.woodwhale.king.code01"})
@Configuration
public class AppConfig2 {

}

@ComponentScan注解会扫描当前包及其子包的所有带@Component@Controller@Service@Repository注解的组件。

1
2
3
4
5
6
7
8
@Test
public void testComponentScan() {
ApplicationContext applicationContext = new AnnotationConfigApplicationContext(AppConfig2.class);
String[] definitionNames = applicationContext.getBeanDefinitionNames();
for (String name : definitionNames) {
System.out.println(name);
}
}

输出结果:

appConfig2
appConfig
book
bookController
bookDao
bookService
person

@ComponentScan 这个注解上,也是可以指定要排除哪些包或者是只包含哪些包来进行管理:里面传是一个Filter[]数组:

1
2
3
// @ComponentScan 源码
Filter[] includeFilters() default {};
Filter[] excludeFilters() default {};

xml 版本:

1
2
3
4
5
6
7
<!--包扫描,只要注解了@Component,@Controller等会被扫描-->
<context:component-scan base-package="org.woodwhale.king.code01" use-default-filters="false" >
<!--排除某个注解,除了Controller其他类都会被扫描-->
<context:exclude-filter type="annotation" expression="org.springframework.stereotype.Controller"/>
<!--只包含某个注解-->
<context:include-filter type="annotation" expression="org.springframework.stereotype.Controller"/>
</context:component-scan>

注解版:

1
2
3
4
5
6
7
8
@ComponentScan(basePackages = {"org.woodwhale.king.code01.*"},
excludeFilters = {
@Filter(type = FilterType.ANNOTATION, classes = {Controller.class, Service.class})
})
@Configuration
public class AppConfig2 {

}

其中Filter的type的类型有:

  1. FilterType.ANNOTATION 按照注解

  2. FilterType.ASSIGNABLE_TYPE 按照类型 FilterType.REGEX 按照正则

  3. FilterType.ASPECTJ 按照ASPECJ表达式规则

  4. FilterType.CUSTOM 使用自定义规则

excludeFilters = Filter[] 指定在扫描的时候按照什么规则来排除脑哪些组件

includeFilters = Filter[] 指定在扫描的时候,只需要包含哪些组件

其中自定义规则类型过滤器需要实现TypeFilter接口:

1
2
3
4
5
6
7
8
9
10
11
12
13
14
15
16
17
18
19
20
21
22
23
24
25
26
27
28
29
30
@Component
public class MyTypeFilter implements TypeFilter {

/**
* metadataReader:读取到的当前正在扫描的类的信息
* metadataReaderFactory:可以获取到其他任何类信息的
*/
@Override
public boolean match(MetadataReader metadataReader, MetadataReaderFactory metadataReaderFactory)
throws IOException {

//获取当前类注解的信息
AnnotationMetadata annotationMetadata = metadataReader.getAnnotationMetadata();

//获取当前正在扫描的类的类信息
ClassMetadata classMetadata = metadataReader.getClassMetadata();

//获取当前类资源(类的路径)
Resource resource = metadataReader.getResource();

String className = classMetadata.getClassName();
if(className.contains("Dao")){
System.out.println("--->"+className);
return true;
}

return false;
}

}

FilterType.CUSTOM过滤器过滤:

1
2
3
4
5
6
7
8
@ComponentScan(basePackages = {"org.woodwhale.king.code02"},
includeFilters = {
@Filter( type=FilterType.CUSTOM, classes= { MyTypeFilter.class })
}, useDefaultFilters = false)
@Configuration
public class AppConfig2 {

}

输出结果:

—>org.woodwhale.king.code01.dao.BookDao
org.springframework.context.annotation.internalConfigurationAnnotationProcessor
org.springframework.context.annotation.internalAutowiredAnnotationProcessor
org.springframework.context.annotation.internalCommonAnnotationProcessor
org.springframework.context.event.internalEventListenerProcessor
org.springframework.context.event.internalEventListenerFactory
appConfig2
bookDao

FilterType.ANNOTATION注解过滤:

1
2
3
4
5
6
7
8
@ComponentScan(basePackages = {"org.woodwhale.king.code02"},
includeFilters = {
@Filter( type=FilterType.ANNOTATION, classes= { Service.class })
}, useDefaultFilters = false)
@Configuration
public class AppConfig2 {

}

输出结果:

org.springframework.context.annotation.internalConfigurationAnnotationProcessor
org.springframework.context.annotation.internalAutowiredAnnotationProcessor
org.springframework.context.annotation.internalCommonAnnotationProcessor
org.springframework.context.event.internalEventListenerProcessor
org.springframework.context.event.internalEventListenerFactory
appConfig2
bookService

我们还可以用 @ComponentScans来定义多个扫描规则:里面是@ComponentScan规则的数组(但是这样写的话,就必须要 java8 及以上的支持):

1
2
3
4
5
6
7
8
9
10
11
@ComponentScans({@ComponentScan("org.woodwhale.king.code01"),
@ComponentScan("org.woodwhale.king.code03")
})
@ComponentScan(basePackages = {"org.woodwhale.king.code02"},
includeFilters = {
@Filter( type=FilterType.ANNOTATION, classes= { Service.class })
}, useDefaultFilters = false)
@Configuration
public class AppConfig2 {

}

2.4 bean 的作用域

spring 默认将所有的bean 以单例的形式注入,在容器初始化之前就会创建这个实例,直到容器关闭,会一直存在这个唯一的对象。

注意:当作用域为单例的时候,IOC容器在启动的时候,就会将容器中所有作用域为单例的bean的实例给创建出来;以后的每次获取,就直接从IOC容器中来获取,相当于是从map.get()的一个过程;也就是 spring 在任何人没有获取 bean 的时候就缓存一份实例。

配置类:

1
2
3
4
5
@ComponentScan(basePackages= {"org.woodwhale.king.code03"})
@Configuration
public class AppConfig3 {

}

创建一个 bean 对象:

1
2
3
4
@Component
public class Student {

}

多次从容器获取 bean :

1
2
3
4
5
6
7
8
9
10
11
12
13
public class TestCode03 {

ApplicationContext applicationContext = new AnnotationConfigApplicationContext(AppConfig3.class);

@Test
public void testScopes() {
Student student1 = applicationContext.getBean(Student.class);
Student student2 = applicationContext.getBean(Student.class);
System.out.println(student1);
System.out.println(student2);
System.out.println(student1 == student2);
}
}

输出结果:

org.woodwhale.king.code03.Student@b62fe6d
true

我们可以用@Scope这个注解来指定作用域的范围:这个就相当于在xml文件中配置的<bean>标签里面指定prototype属性:

1
2
3
4
5
6
7
8
9
10
11
12
13
	/**
* Specifies the name of the scope to use for the annotated component/bean.
* <p>Defaults to an empty string ({@code ""}) which implies
* {@link ConfigurableBeanFactory#SCOPE_SINGLETON SCOPE_SINGLETON}.
* @since 4.2
* @see ConfigurableBeanFactory#SCOPE_PROTOTYPE
* @see ConfigurableBeanFactory#SCOPE_SINGLETON
* @see org.springframework.web.context.WebApplicationContext#SCOPE_REQUEST
* @see org.springframework.web.context.WebApplicationContext#SCOPE_SESSION
* @see #value
*/
@AliasFor("value")
String scopeName() default "";

从源码的注释上,我们可以知道scopeName可以取下面这些值:

  • ConfigurableBeanFactory#SCOPE_PROTOTYPE

    单实例的(默认值):ioc容器启动会调用方法创建对象放到ioc容器中。以后每次获取就是直接从容器(map.get())中拿。

  • ConfigurableBeanFactory#SCOPE_SINGLETON

    多实例的:ioc容器启动并不会去调用方法创建对象放在容器中。每次获取的时候才会调用方法创建对象。

  • org.springframework.web.context.WebApplicationContext#SCOPE_REQUEST

    同一次请求创建一个实例

  • org.springframework.web.context.WebApplicationContext#SCOPE_SESSION

    同一个session创建一个实例

配置原型模式(ConfigurableBeanFactory#SCOPE_PROTOTYPE):

1
2
3
4
5
6
7
8
9
10
11
@ComponentScan(basePackages= {"org.woodwhale.king.code03"})
@Configuration
public class AppConfig3 {

@Scope(ConfigurableBeanFactory.SCOPE_PROTOTYPE)
@Bean
public Student student() {
System.out.println("drop student into Spring IOC ...");
return new Student();
}
}

测试输出结果:

drop student into Spring IOC …
org.woodwhale.king.code03.Student@78047b92
org.woodwhale.king.code03.Student@8909f18
false

我们可以发现,我们用getBean()方法获取几次,就创建几次bean的实例;也就是说当bean是作用域为多例的时候,IOC容器启动的时候,就不会去创建bean的实例的,而是当我们调用getBean()获取的时候去创建bean的实例;而且每次调用的时候,都会创建bean的实例;

2.5 懒加载

@Lazy注解可以在容器启动不创建对象。第一次使用(获取)Bean创建对象,并初始化:

1
2
3
4
5
6
@Lazy
@Bean
public Student student() {
System.out.println("drop student into Spring IOC ...");
return new Student();
}

2.6 @Conditional 按照条件注册bean

@Conditional:按照一定的条件进行判断,满足条件给容器中注册bean

举例:要求容器根据操作系统注入不同的bean,如果系统是 windows,给容器中注册(“bill”),如果是linux系统,给容器中注册(“linus”)。

实现Condition接口,并重写匹配条件逻辑:

windows 条件:

1
2
3
4
5
6
7
8
9
10
11
12
13
14
15
16
17
public class WindowsCondition implements Condition {

@Override
public boolean matches(ConditionContext context, AnnotatedTypeMetadata metadata) {
// 获取当前容器的环境信息
Environment environment = context.getEnvironment();

// 获取系统的名称
String osName = environment.getProperty("os.name");
if(osName.contains("Windows")){
return true;
}

return false;
}

}

linux 条件:

1
2
3
4
5
6
7
8
9
10
11
12
13
14
15
16
17
18
public class LinuxCondition implements Condition {

@Override
public boolean matches(ConditionContext context, AnnotatedTypeMetadata metadata) {
// 获取当前容器的环境信息
Environment environment = context.getEnvironment();

// 获取系统的名称
String osName = environment.getProperty("os.name");
System.out.println("osName --> " + osName);
if(osName.contains("Linux")){
return true;
}

return false;
}

}

@Conditional 按照一定条件进行判断,满足条件容器中注册bean,若放在类中,整个配置类中的bean满足条件才会被加载到容器中:

1
2
3
4
5
6
7
8
9
10
11
12
13
14
15
@Configuration
public class AppConfig4 {

@Conditional(WindowsCondition.class)
@Bean("bill")
public Boss boss1(){
return new Boss("Bill Gates", 62);
}

@Conditional(LinuxCondition.class)
@Bean("linus")
public Boss boss2(){
return new Boss("linus", 48);
}
}

测试一下注入容器的 id 是谁:

运行测试会发现,spring 只注入了 id 为 linus 的 bean 对象。

1
2
3
4
5
6
7
8
9
10
11
12
public class TestCode04 {

ApplicationContext applicationContext = new AnnotationConfigApplicationContext(AppConfig4.class);

@Test
public void testCondition() {
String[] definitionNames = applicationContext.getBeanDefinitionNames();
for (String name : definitionNames) {
System.out.println(name);
}
}
}

在 windows 系统运行,可以看到只输出了 id 为 bill 的 bean,可以在 JVM 运行参数中手动设置系统环境参数:-Dos.name=Linux,再次运行,则输出了 id 为 linus 的 bean

2.7 @Import 导入组件

2.7.1 导入 bean 的类对象

@Import(bean的类对象)可以快速导入一个 bean ,而不需要使用@Bean注解一个方法的形式:只要将要注册bean 的类对象传进去,容器就能自动注册这个组:

1
2
3
4
5
@Import(Color.class)
@Configuration
public class AppConfig5 {

}

测试是否导入成功:

1
2
3
4
5
6
7
8
9
10
11
public class TestCode05 {
ApplicationContext applicationContext = new AnnotationConfigApplicationContext(AppConfig5.class);

@Test
public void testImport() {
String[] definitionNames = applicationContext.getBeanDefinitionNames();
for (String name : definitionNames) {
System.out.println(name);
}
}
}

输出结果:

appConfig5
org.woodwhale.king.code05.Color

从输出结果可以看出:@Import(bean的类对象)注册的 id 默认是全类名。

2.7.2 导入 ImportSelector 的实现类类对象

实现ImportSelector接口,重写selectImports()方法,返回要注册的 bean 对象的全类名:

1
2
3
4
5
6
7
8
public class MyImportSelector implements ImportSelector {

@Override
public String[] selectImports(AnnotationMetadata importingClassMetadata) {
return new String[]{"org.woodwhale.king.code05.Blue"};
}

}

导入 实现类

1
2
3
4
5
@Import({Color.class, MyImportSelector.class})
@Configuration
public class AppConfig5 {

}

2.7.3 手动注册 bean

实现ImportBeanDefinitionRegistrar接口,重写注册 bean 的注册方法,将所有要注册的 bean 手动注册 进容器:

1
2
3
4
5
6
7
8
9
10
11
12
13
14
15
16
17
18
19
20
21
22
/**
* AnnotationMetadata:当前类的注解信息
* BeanDefinitionRegistry:BeanDefinition注册类
*/
@Override
public void registerBeanDefinitions(AnnotationMetadata importingClassMetadata, BeanDefinitionRegistry registry) {

String[] beanNames = registry.getBeanDefinitionNames();
for (String beanName : beanNames) {
System.out.println("registerBeanDefinitions --> " + beanName);
}

boolean blue = registry.containsBeanDefinition("org.woodwhale.king.code05.Blue");
boolean color = registry.containsBeanDefinition("org.woodwhale.king.code05.Color");

if(color && blue) {
// 手动创建一个 BeanDefinition 并注册到容器中
RootBeanDefinition rootBeanDefinition = new RootBeanDefinition(RainBow.class);
registry.registerBeanDefinition("rainBow", rootBeanDefinition);
}

}

将这个实现类导入到容器中:

1
2
3
4
5
@Import({Color.class, MyImportSelector.class, MyImportBeanDefinitionRegistrar.class})
@Configuration
public class AppConfig5 {

}

输出结果:

appConfig5
org.woodwhale.king.code05.Color
org.woodwhale.king.code05.Blue
rainBow

注意:当所有组件都注册成功之后,才执行这个实现类的注册方法。

2.8 使用FactoryBean注册组件

首先创建一个类实现FactoryBean<T>接口,其中T是要注册的Bean的类型:

1
2
3
4
5
6
7
8
9
10
11
12
13
14
15
16
17
18
19
20
21
22
public class ColorFactoryBean implements FactoryBean<Color> {

@Override
public Color getObject() throws Exception {
System.out.println("getObject --> new Color()");
return new Color();
}

@Override
public Class<?> getObjectType() {
return Color.class;
}

/**
* 接口的默认方法,默认返回true,表示单例模式
* 返回 false 表示每次获取 bean 的时候就会调用getObject()方法
*/
@Override
public boolean isSingleton() {
return false;
}
}

将工厂类注册到配置类中:

1
2
3
4
5
6
7
8
@Configuration
public class AppConfig5 {

@Bean
public ColorFactoryBean colorFactoryBean() {
return new ColorFactoryBean();
}
}

编写测试类:

1
2
3
4
5
6
7
8
9
10
11
12
@Test
public void testFactoryBean() {
Color colorFactoryBean1 = (Color)applicationContext.getBean("colorFactoryBean");
Color colorFactoryBean2 = (Color)applicationContext.getBean("colorFactoryBean");
System.out.println("bean class type --> " + colorFactoryBean1.getClass());

System.out.println(colorFactoryBean1 == colorFactoryBean2);

// 在id前面增加 &,获取工厂对象本身
Object bean = applicationContext.getBean("&colorFactoryBean");
System.out.println("bean class type --> " + bean.getClass());
}

输出结果:

getObject –> new Color()
bean class type –> class org.woodwhale.king.code05.Color
false
bean class type –> class org.woodwhale.king.code05.ColorFactoryBean

3. 总结

xml 配置文件在 spring 注解开发中已经被替换成了Java 配置类,要成为具有 xml 功能的配置类,就需要在类名上增加@Configuration注解。

bean 组件注册的方式有以下:

  1. 使用@Bean注解,编写创建 bean 并返回这个bean 的共有方法,在这个方法上加注解,默认会将方法名作为bean 的 id。

容器默认装载的 bean 都是单例的,如果需要多例的 bean ,就需要添加@Scope注解。

  1. 实现Condition接口,并自定义条件规则,使用注解@Conditional对 bean 进行有条件的注册

  2. 使用@Import注解导入组件,有三种方式:

    • 直接传入 bean 的类对象到@Import属性中。
    • 实现ImportSelector接口,重写selectImports()方法,返回将要注册的bean 的全类名字符串数组,最后将这个实现类的类对象传入@Import属性中。
    • 实现ImportBeanDefinitionRegistrar接口,手动注册 bean 到容器中。
  3. 使用FactoryBean接口的实现类,即 bean 的工厂类,配置到配置类中。

扩展博文:

Spring注解驱动开发(一)

「Java笔记」常见的Spring 注解 总结

Spring注解开发系列Ⅰ— 组件注册(上)

Spring注解开发系列Ⅱ — 组件注册(下)

updated updated 2024-01-05 2024-01-05
本文结束感谢阅读

本文标题:Spring 注解驱动开发之组件注册

本文作者:

微信公号:木鲸鱼 | woodwhales

原始链接:https://woodwhales.cn/2019/07/06/042/

许可协议: 署名-非商业性使用-禁止演绎 4.0 国际 转载请保留原文链接及作者。

0%