SpringBoot + Spring Security 学习笔记(五)实现短信验证码+登录功能

在 Spring Security 中基于表单的认证模式,默认就是密码帐号登录认证,那么对于短信验证码+登录的方式,Spring Security 没有现成的接口可以使用,所以需要自己的封装一个类似的认证过滤器和认证处理器实现短信认证。

短信验证码认证

验证码对象类设计

和图片验证码一样,需要自己封装一个验证码对象,用来生成手机验证码并发送给手机。因为图片验证码和手机验证码对象的区别就在于前者多了个图片对象,所以两者共同部分抽象出来可以设计成一个ValidateCode类,这个类里面只存放验证码和过期时间,短信验证码直接使用这个类即可:

1
2
3
4
5
6
7
8
9
10
11
12
13
14
15
16
17
18
19
20
21
22
23
24
25
26
import java.time.LocalDateTime;

import lombok.Data;

@Data
public class ValidateCode {

private String code;

private LocalDateTime expireTime;

public ValidateCode(String code, int expireIn){
this.code = code;
this.expireTime = LocalDateTime.now().plusSeconds(expireIn);
}

public boolean isExpried() {
return LocalDateTime.now().isAfter(getExpireTime());
}

public ValidateCode(String code, LocalDateTime expireTime) {
super();
this.code = code;
this.expireTime = expireTime;
}
}

图片验证码承继此类:

1
2
3
4
5
6
7
8
9
10
11
12
13
14
15
16
17
18
19
20
21
22
23
24
25
import java.awt.image.BufferedImage;
import java.time.LocalDateTime;

import org.woodwhales.king.validate.code.ValidateCode;

import lombok.Data;
import lombok.EqualsAndHashCode;

@Data
@EqualsAndHashCode(callSuper=false)
public class ImageCode extends ValidateCode {

private BufferedImage image;

public ImageCode(BufferedImage image, String code, int expireId) {
super(code, LocalDateTime.now().plusSeconds(expireId));
this.image = image;
}

public ImageCode(BufferedImage image, String code, LocalDateTime localDateTime) {
super(code, localDateTime);
this.image = image;
}

}

验证码生成类设计

由于图片和短信类均可以生成相应的验证码,所以直接设计一个验证码生成接口,具体实现类根据业务进行实现:

1
2
3
4
5
6
7
import org.springframework.web.context.request.ServletWebRequest;

public interface ValidateCodeGenerator {

ValidateCode generate(ServletWebRequest request);

}

这里的传参设计成了ServletWebRequest是能够根据前端请求中的参数进行不同的业务实现

目前实现累只有图片生成器和验证码生成器:

1
2
3
4
5
6
7
8
9
10
11
12
13
14
15
16
17
18
19
20
21
22
23
24
25
26
27
28
29
30
// 图片验证码生成器
@Component("imageCodeGenerator")
public class ImageCodeGenerator implements ValidateCodeGenerator {

/**
* 生成图形验证码
* @param request
* @return
*/
@Override
public ValidateCode generate(ServletWebRequest request) {

……

return new ImageCode(image, sRand, SecurityConstants.EXPIRE_SECOND);

}
}

// 短信验证码生成器
@Component("smsCodeGenerator")
public class SmsCodeGenerator implements ValidateCodeGenerator {

@Override
public ValidateCode generate(ServletWebRequest request) {
String code = RandomStringUtils.randomNumeric(SecurityConstants.SMS_RANDOM_SIZE);
return new ValidateCode(code, SecurityConstants.SMS_EXPIRE_SECOND);
}

}

短信验证码发送接口设计

短信验证码生成之后,需要设计接口依赖短信服务提供商进行验证码发送,因此至少设计一个统一的接口,供短信服务提供商生成发送短信服务:

1
2
3
4
5
public interface SmsCodeSender {
// 至少需要手机号和验证码
void send(String mobile, String code);

}

为了演示,设计一个虚拟的默认短信发送器,只在日志文件中打印一行log:

1
2
3
4
5
6
7
8
9
10
11
12
13
14
15
16
17
18
import org.springframework.stereotype.Service;

import lombok.extern.slf4j.Slf4j;

/**
* 短信发送模拟
* @author Administrator
*
*/
@Slf4j
@Service
public class DefaultSmsCodeSender implements SmsCodeSender {

@Override
public void send(String mobile, String code) {
log.debug("send to mobile :{}, code : {}", mobile, code);
}
}

短信验证码请求Controller

所有验证码的请求都在统一的ValidateCodeController里,这里注入了两个验证码生成器ValidateCodeGenerator,后期可以利用 spring 的依赖查找/搜索技巧来重构代码,另外所有的请求也是可以做成动态配置,这里临时全部 hardCode 在代码里:

1
2
3
4
5
6
7
8
9
10
11
12
13
14
15
16
17
18
19
20
21
22
23
24
25
26
27
28
29
30
31
32
33
34
35
36
37
38
39
40
41
42
43
44
45
46
47
48
49
import java.io.IOException;

import javax.imageio.ImageIO;
import javax.servlet.http.HttpServletRequest;
import javax.servlet.http.HttpServletResponse;

import org.springframework.beans.factory.annotation.Autowired;
import org.springframework.social.connect.web.SessionStrategy;
import org.springframework.web.bind.ServletRequestBindingException;
import org.springframework.web.bind.ServletRequestUtils;
import org.springframework.web.bind.annotation.GetMapping;
import org.springframework.web.bind.annotation.RestController;
import org.springframework.web.context.request.ServletWebRequest;
import org.woodwhales.king.core.commons.SecurityConstants;
import org.woodwhales.king.validate.code.ValidateCode;
import org.woodwhales.king.validate.code.ValidateCodeGenerator;
import org.woodwhales.king.validate.code.image.ImageCode;
import org.woodwhales.king.validate.code.sms.DefaultSmsCodeSender;

@RestController
public class ValidateCodeController {

@Autowired
private SessionStrategy sessionStrategy;

@Autowired
private ValidateCodeGenerator imageCodeGenerator;

@Autowired
private ValidateCodeGenerator smsCodeGenerator;

@Autowired
private DefaultSmsCodeSender defaultSmsCodeSender;

@GetMapping("code/image")
public void createImageCode(HttpServletRequest request, HttpServletResponse response) throws IOException {
ImageCode imageCode = (ImageCode)imageCodeGenerator.generate(new ServletWebRequest(request));
sessionStrategy.setAttribute(new ServletWebRequest(request), SecurityConstants.SESSION_KEY, imageCode);
ImageIO.write(imageCode.getImage(), "JPEG", response.getOutputStream());
}

@GetMapping("code/sms")
public void createSmsCode(HttpServletRequest request, HttpServletResponse response) throws ServletRequestBindingException {
ValidateCode smsCode = smsCodeGenerator.generate(new ServletWebRequest(request));
sessionStrategy.setAttribute(new ServletWebRequest(request), SecurityConstants.SESSION_KEY, smsCode);
String mobile = ServletRequestUtils.getStringParameter(request, "mobile");
defaultSmsCodeSender.send(mobile, smsCode.getCode());
}
}

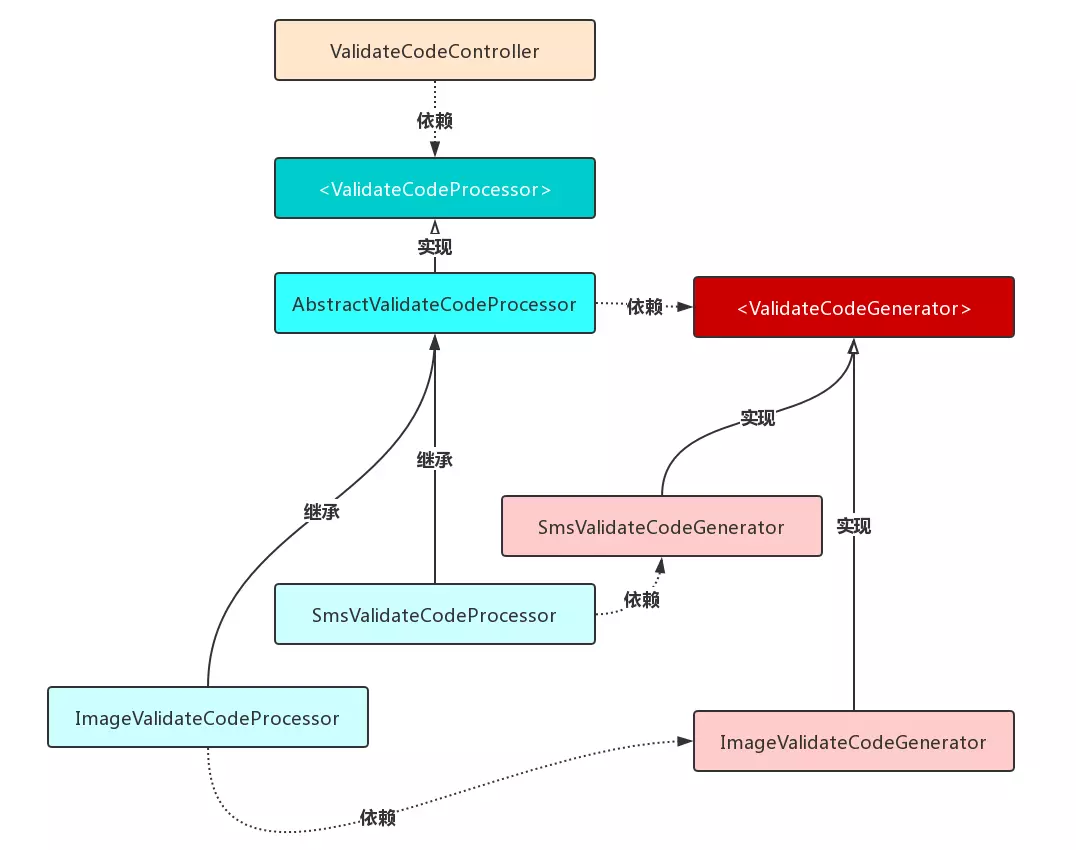
从上述代码中可以看出图片验证码和短信验证码的生成请求逻辑是相似的:首先调用验证码生成接口生成验证码,然后将验证码放入 session 中,最后将验证码返回给前端或者用户。因此这个套路流程可以抽象成一个模板方法,以增强代码的可维护性和可扩展性。

用一张图来表述重构后的代码结构:

随机验证码过滤器设计

由于图片和手机都会产生验证码,后期还可以通过邮件发送随机验证码的方式进行随机验证码登录验证,因此将随机验证码的认证可以独立封装在一个随机验证码过滤器中,并且这个过滤器在整个 spring security 过滤器链的最前端(它是第一道认证墙)。

随机验证码过滤器只要继承 spring 框架中的OncePerRequestFilter即可保证这个过滤器在请求来的时候只被调用一次,具体代码实现参见文末源码。

这里重点解释一下如何将随机验证码过滤器配置到 spring security 过滤器认证最前端,需要重写SecurityConfigurerAdapterconfigure()方法,并将自定义的过滤器放到AbstractPreAuthenticatedProcessingFilter过滤器之前即可:

1
2
3
4
5
6
7
8
9
10
11
12
13
14
15
16
17
18
19
20
21
22
import org.springframework.beans.factory.annotation.Autowired;
import org.springframework.security.config.annotation.SecurityConfigurerAdapter;
import org.springframework.security.config.annotation.web.builders.HttpSecurity;
import org.springframework.security.web.DefaultSecurityFilterChain;
import org.springframework.security.web.authentication.preauth.AbstractPreAuthenticatedProcessingFilter;
import org.springframework.stereotype.Component;

import javax.servlet.Filter;


@Component
public class ValidateCodeSecurityConfig extends SecurityConfigurerAdapter<DefaultSecurityFilterChain, HttpSecurity> {

@Autowired
private Filter validateCodeFilter;

@Override
public void configure(HttpSecurity http) throws Exception {
super.configure(http);
http.addFilterBefore(validateCodeFilter, AbstractPreAuthenticatedProcessingFilter.class);
}
}

短信验证码认证

在自定义短信登录认证流程之前,建议可以移步到之前的文章:SpringBoot + Spring Security 学习笔记(二)安全认证流程源码详解,了解清除用户密码的认证流程才能更容易理解下面这张经典的流程图:

左侧是用户+密码的认证流程,整体的流程就是经过用户名+密码认证过滤器认证,将请求封装成 token 并注入到 AutheticationMananger 中,之后由默认的认证校验器进行校验,在校验的过程中会调用 UserDetailsService 接口进行 token 校验,当校验成功之后,就会将已经认证的 token 放到 SecurityContextHolder 中。

同理,由于短信登录方式只需要使用随机验证码进行校验而不需要密码登录功能,当校验成功之后就认为用户认证成功了,因此需要仿造左侧的流程开发自定义的短信登录认证 token,这个 token 只需要存放手机号即可,在token 校验的过程中,不能使用默认的校验器了,需要自己开发校验当前自定义 token 的校验器,最后将自定义的过滤器和校验器配置到 spring security 框架中即可。

注意:短信随机验证码的验证过程是在 SmsCodeAuthticationFIlter 之前就已经完成。
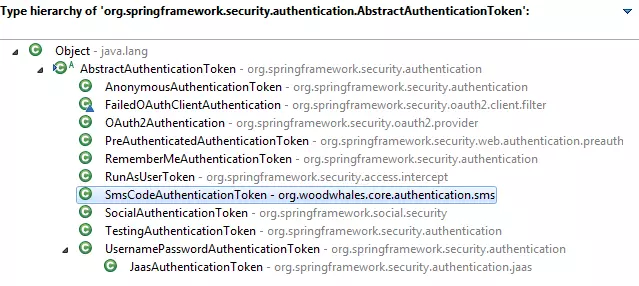
短信登录认证Token

仿造UsernamePasswordAuthenticationToken设计一个属于短信验证的认证 token 对象,为什么要自定义一个短信验证的 token,spring security 框架不只提供了用户名+密码的验证方式,用户认证是否成功,最终看的就是SecurityContextHolder对象中是否有对应的AuthenticationToken,因此要设计一个认证对象,当认证成功之后,将其设置到SecurityContextHolder即可。

1
2
3
4
5
6
7
8
9
10
11
12
13
14
15
16
17
18
19
20
21
22
23
24
25
26
27
28
29
30
31
32
33
34
35
36
37
38
39
40
41
42
43
44
45
46
import java.util.Collection;

import org.springframework.security.authentication.AbstractAuthenticationToken;
import org.springframework.security.core.GrantedAuthority;
import org.springframework.security.core.SpringSecurityCoreVersion;

public class SmsCodeAuthenticationToken extends AbstractAuthenticationToken {

private static final long serialVersionUID = SpringSecurityCoreVersion.SERIAL_VERSION_UID;

private final Object principal;

public SmsCodeAuthenticationToken(Object mobile) {
super(null);
this.principal = mobile;
setAuthenticated(false);
}

public SmsCodeAuthenticationToken(Object mobile, Collection<? extends GrantedAuthority> authorities) {
super(authorities);
this.principal = mobile;
super.setAuthenticated(true); // must use super, as we override
}

public Object getPrincipal() {
return this.principal;
}

public Object getCredentials() {
return null;
}

public void setAuthenticated(boolean isAuthenticated) throws IllegalArgumentException {
if (isAuthenticated) {
throw new IllegalArgumentException("Cannot set this token to trusted - use constructor which takes a GrantedAuthority list instead");
}

super.setAuthenticated(false);
}

@Override
public void eraseCredentials() {
super.eraseCredentials();
}

}

AuthenticationToken接口可以看到,现在框架中有我们自己定义短信登录的 token 了:
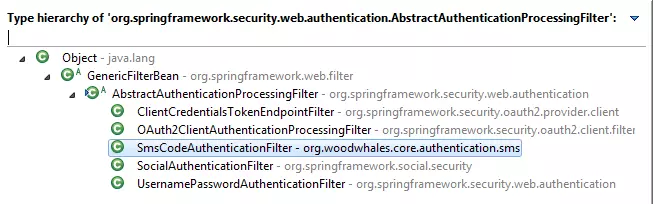
短信登录认证过滤器

短信验证码的过滤器设计思路同理,仿造UsernamePasswordAuthenticationFilter过滤器,这里再次提醒,短信随机验证码

1
2
3
4
5
6
7
8
9
10
11
12
13
14
15
16
17
18
19
20
21
22
23
24
25
26
27
28
29
30
31
32
33
34
35
36
37
38
39
40
41
42
43
44
45
46
47
48
49
50
51
52
53
54
55
56
57
58
59
60
61
62
63
64
65
66
67
68
69
70
71
72
73
import java.util.Objects;

import javax.servlet.http.HttpServletRequest;
import javax.servlet.http.HttpServletResponse;

import org.springframework.security.authentication.AuthenticationServiceException;
import org.springframework.security.core.Authentication;
import org.springframework.security.core.AuthenticationException;
import org.springframework.security.web.authentication.AbstractAuthenticationProcessingFilter;
import org.springframework.security.web.util.matcher.AntPathRequestMatcher;
import org.springframework.util.Assert;
import org.woodwhales.core.constants.SecurityConstants;

public class SmsCodeAuthenticationFilter extends AbstractAuthenticationProcessingFilter {

/**
* 请求中的参数
*/
private String mobileParameter = SecurityConstants.DEFAULT_PARAMETER_NAME_MOBILE;

private boolean postOnly = true;

public SmsCodeAuthenticationFilter() {
super(new AntPathRequestMatcher(SecurityConstants.DEFAULT_LOGIN_PROCESSING_URL_MOBILE, "POST"));
}

public Authentication attemptAuthentication(HttpServletRequest request, HttpServletResponse response) throws AuthenticationException {
if (postOnly && !request.getMethod().equals("POST")) {
throw new AuthenticationServiceException("Authentication method not supported: " + request.getMethod());
}

// 获取请求中的参数值
String mobile = obtainMobile(request);

if (Objects.isNull(mobile)) {
mobile = "";
}

mobile = mobile.trim();

SmsCodeAuthenticationToken authRequest = new SmsCodeAuthenticationToken(mobile);

// Allow subclasses to set the "details" property
setDetails(request, authRequest);

return this.getAuthenticationManager().authenticate(authRequest);
}

/**
* 获取手机号
*/
protected String obtainMobile(HttpServletRequest request) {
return request.getParameter(mobileParameter);
}

protected void setDetails(HttpServletRequest request, SmsCodeAuthenticationToken authRequest) {
authRequest.setDetails(authenticationDetailsSource.buildDetails(request));
}

public void setMobileParameter(String mobileParameter) {
Assert.hasText(mobileParameter, "Mobile parameter must not be empty or null");
this.mobileParameter = mobileParameter;
}

public void setPostOnly(boolean postOnly) {
this.postOnly = postOnly;
}

public final String getMobileParameter() {
return mobileParameter;
}

}

短信验证码过滤器也成为了AbstractAuthenticationProcessingFilter其中一个子类,后期需要注册到安全配置中,让它成为安全认证过滤链中的一环:
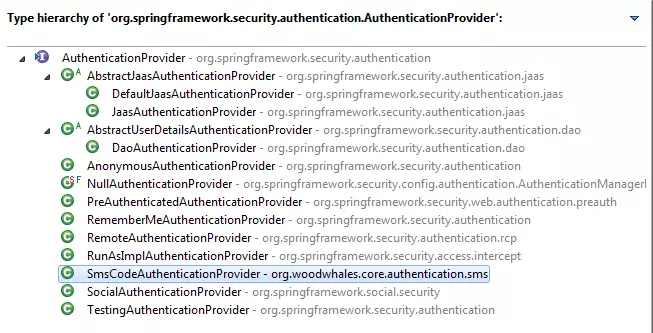
短信登录认证校验器

短信登录认证校验器的作用就是调用UserDetailsServiceloadUserByUsername()方法对 authenticationToken 进行校验,所有校验器的根接口为:AuthenticationProvider,因此自定义的短信登录认证校验器实现这个接口,重写authenticate()即可:

1
2
3
4
5
6
7
8
9
10
11
12
13
14
15
16
17
18
19
20
21
22
23
24
25
26
27
28
29
30
31
32
33
34
35
36
37
38
39
40
41
42
43
import java.util.Objects;

import org.springframework.security.authentication.AuthenticationProvider;
import org.springframework.security.authentication.InternalAuthenticationServiceException;
import org.springframework.security.core.Authentication;
import org.springframework.security.core.AuthenticationException;
import org.springframework.security.core.userdetails.UserDetails;
import org.springframework.security.core.userdetails.UserDetailsService;

import lombok.Data;

@Data
public class SmsCodeAuthenticationProvider implements AuthenticationProvider {

private UserDetailsService userDetailsService;

@Override
public Authentication authenticate(Authentication authentication) throws AuthenticationException {

SmsCodeAuthenticationToken authenticationToken = (SmsCodeAuthenticationToken) authentication;

/**
* 调用 {@link UserDetailsService}
*/
UserDetails user = userDetailsService.loadUserByUsername((String)authenticationToken.getPrincipal());

if (Objects.isNull(user)) {
throw new InternalAuthenticationServiceException("无法获取用户信息");
}

SmsCodeAuthenticationToken authenticationResult = new SmsCodeAuthenticationToken(user, user.getAuthorities());

authenticationResult.setDetails(authenticationToken.getDetails());

return authenticationResult;
}

@Override
public boolean supports(Class<?> authentication) {
return SmsCodeAuthenticationToken.class.isAssignableFrom(authentication);
}

}

注意,这里使用@Data注解生成 setter 和 getter 方法。

短信登录认证安全配置设计

设计一个封装好的短信登录认证配置类,以供外部调用者直接调用:

1
2
3
4
5
6
7
8
9
10
11
12
13
14
15
16
17
18
19
20
21
22
23
24
25
26
27
28
29
30
31
32
33
34
35
36
37
38
39
40
import org.springframework.beans.factory.annotation.Autowired;
import org.springframework.security.authentication.AuthenticationManager;
import org.springframework.security.config.annotation.SecurityConfigurerAdapter;
import org.springframework.security.config.annotation.web.builders.HttpSecurity;
import org.springframework.security.core.userdetails.UserDetailsService;
import org.springframework.security.web.DefaultSecurityFilterChain;
import org.springframework.security.web.authentication.AuthenticationFailureHandler;
import org.springframework.security.web.authentication.AuthenticationSuccessHandler;
import org.springframework.security.web.authentication.UsernamePasswordAuthenticationFilter;
import org.springframework.stereotype.Component;

@Component
public class SmsCodeAuthenticationSecurityConfig extends SecurityConfigurerAdapter<DefaultSecurityFilterChain, HttpSecurity> {

@Autowired
private AuthenticationSuccessHandler myAuthenticationSuccessHandler;

@Autowired
private AuthenticationFailureHandler myAuthenticationFailureHandler;

@Autowired
private UserDetailsService userDetailsService;

@Override
public void configure(HttpSecurity http) throws Exception {

SmsCodeAuthenticationFilter smsCodeAuthenticationFilter = new SmsCodeAuthenticationFilter();
smsCodeAuthenticationFilter.setAuthenticationManager(http.getSharedObject(AuthenticationManager.class));
smsCodeAuthenticationFilter.setAuthenticationSuccessHandler(myAuthenticationSuccessHandler);
smsCodeAuthenticationFilter.setAuthenticationFailureHandler(myAuthenticationFailureHandler);

// 获取验证码提供者
SmsCodeAuthenticationProvider smsCodeAuthenticationProvider = new SmsCodeAuthenticationProvider();
smsCodeAuthenticationProvider.setUserDetailsService(userDetailsService);

// 将短信验证码校验器注册到 HttpSecurity, 并将短信验证码过滤器添加在 UsernamePasswordAuthenticationFilter 之前
http.authenticationProvider(smsCodeAuthenticationProvider).addFilterAfter(smsCodeAuthenticationFilter, UsernamePasswordAuthenticationFilter.class);

}
}

当外部想要引用这个封装好的配置,只需要在自定义的AbstractChannelSecurityConfig安全认证配置中添加进去即可,注意这个配置对象使用了@Component注解,注册到了spring 中,所以可以直接通过@Autowired引用,如:

1
2
3
4
5
6
7
8
9
10
11
12
13
14
15
16
17
18
19
20
21
22
23
24
25
26
27
28
29
30
31
32
33
34
35
36
37
38
39
40
41
42
43
44
45
46
47
48
49
50
51
52
53
54
55
56
57
58
59
60
61
62
63
64
65
66
67
68
69
70
71
72
73
74
75
76
77
78
79
80
81
82
83
84
85
86
87
88
89
90
91
import javax.sql.DataSource;

import org.springframework.beans.factory.annotation.Autowired;
import org.springframework.context.annotation.Bean;
import org.springframework.security.config.annotation.web.builders.HttpSecurity;
import org.springframework.security.core.userdetails.UserDetailsService;
import org.springframework.security.web.authentication.AuthenticationFailureHandler;
import org.springframework.security.web.authentication.AuthenticationSuccessHandler;
import org.springframework.security.web.authentication.rememberme.JdbcTokenRepositoryImpl;
import org.springframework.security.web.authentication.rememberme.PersistentTokenRepository;
import org.springframework.stereotype.Component;
import org.woodwhales.core.authentication.sms.AbstractChannelSecurityConfig;
import org.woodwhales.core.authentication.sms.SmsCodeAuthenticationSecurityConfig;
import org.woodwhales.core.validate.code.config.ValidateCodeSecurityConfig;

@Component
public class BrowserSecurityConfig extends AbstractChannelSecurityConfig {

@Autowired
private SmsCodeAuthenticationSecurityConfig smsCodeAuthenticationSecurityConfig;

@Autowired
private ValidateCodeSecurityConfig validateCodeSecurityConfig;

@Autowired
protected AuthenticationSuccessHandler authenticationSuccessHandler;

@Autowired
protected AuthenticationFailureHandler authenticationFailureHandler;

@Autowired
private UserDetailsService userDetailsService;

@Autowired
private DataSource dataSource;

@Override
protected void configure(HttpSecurity http) throws Exception {

http.formLogin()
.loginPage("/authentication/require") // 登录页面回调
.successHandler(authenticationSuccessHandler)// 认证成功回调
.failureHandler(authenticationFailureHandler)

// 以下验证码的校验配置
.and()
.apply(validateCodeSecurityConfig)

// 以下短信登录认证的配置
.and()
.apply(smsCodeAuthenticationSecurityConfig)

// 记住我的配置
.and()
.rememberMe()
.tokenRepository(persistentTokenRepository())
.tokenValiditySeconds(3600) // 设置记住我的过期时间
.userDetailsService(userDetailsService)

.and()
// 请求做授权配置
.authorizeRequests()
// 以下请求路径不需要认证
.antMatchers("/authentication/require",
"/authentication/mobile",
"/login",
"/code/*",
"/")
.permitAll()
.anyRequest() // 任何请求
.authenticated() // 都需要身份认证

// 暂时将防护跨站请求伪造的功能置为不可用
.and()
.csrf().disable();
}

/**
* 配置TokenRepository
* @return
*/
@Bean
public PersistentTokenRepository persistentTokenRepository() {
JdbcTokenRepositoryImpl jdbcTokenRepository = new JdbcTokenRepositoryImpl();
jdbcTokenRepository.setDataSource(dataSource);
// 初始化记住我的数据库表,建议通过看源码直接创建出来
// jdbcTokenRepository.setCreateTableOnStartup(true);
return jdbcTokenRepository;
}

}

这里的配置中有些代码出现了冗余配置,可以全部封装成抽象模板,完成一些基础的配置。

参考源码:https://github.com/imooc-java/security

updated updated 2024-01-05 2024-01-05
本文结束感谢阅读

本文标题:SpringBoot + Spring Security 学习笔记(五)实现短信验证码+登录功能

本文作者:

微信公号:木鲸鱼 | woodwhales

原始链接:https://woodwhales.cn/2019/04/24/030/

许可协议: 署名-非商业性使用-禁止演绎 4.0 国际 转载请保留原文链接及作者。

0%